Upserve POS makes it fast and easy to serve your customers, turn tables and keep the kitchen happy. In this article, you'll learn how to navigate the Upserve POS home screen to perform different administrative tasks on the Upserve POS.
If you are learning how to use the Upserve POS for the first time, visit the Training Resources section for links to Upserve POS training articles and videos. Otherwise, click the quick links below to jump to any section.
Upserve POS Training Resources
Logging in to the Upserve POS
Getting Started: Upserve POS Home Screen
Home Screen Tiles
Managing Checks & Payments
Upserve POS Training Resources
If you are learning how to use the Upserve POS for the first time, you can watch our Staff Training Webinar for a complete walkthrough on how to use the Upserve POS and create/manage checks. You can also review to our additional training articles and practice using the Upserve POS in the Training Mode sandbox environment.
Staff Training Webinar [Video]
If you learn best by watching videos or demonstrations, watch this staff training webinar video to learn how to use the Upserve POS. You can watch the full playlist, or use the drop-down menu to skip to a specific training.
Upserve POS Training Articles & Videos
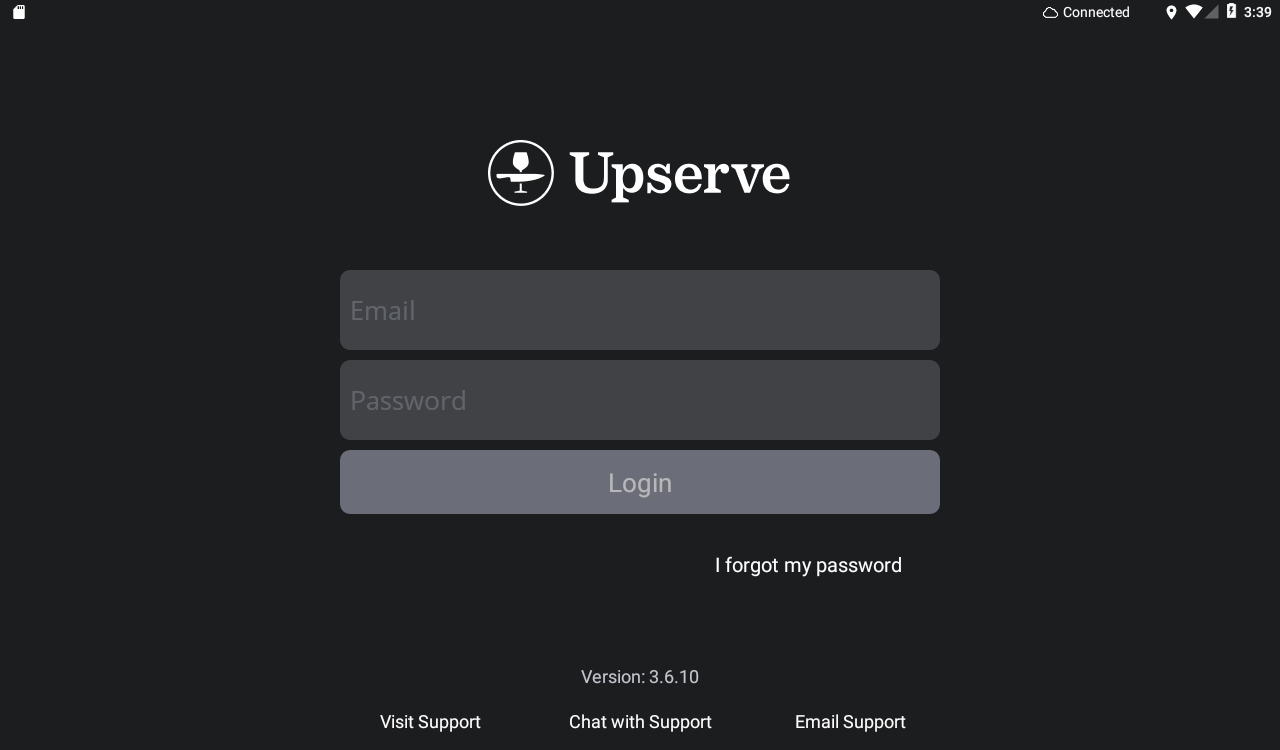
Logging in to the Upserve POS
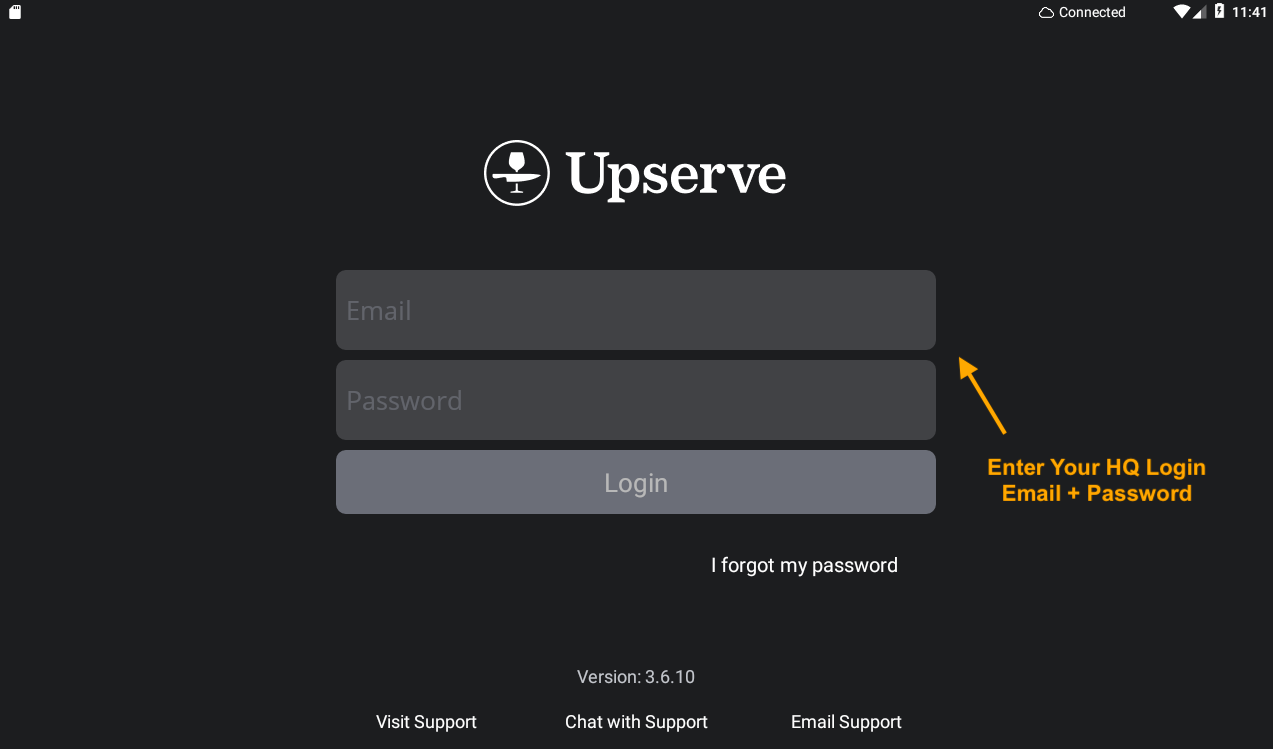
To log in to the Upserve POS you will need to add your preferred email to your HQ User profile. When you add an email address to your User profile, you will receive an email invitation to create an HQ login password.
After your password is successfully created, you can log in to HQ and the Upserve POS with your HQ email address and password.
Getting Started: Upserve POS Home Screen
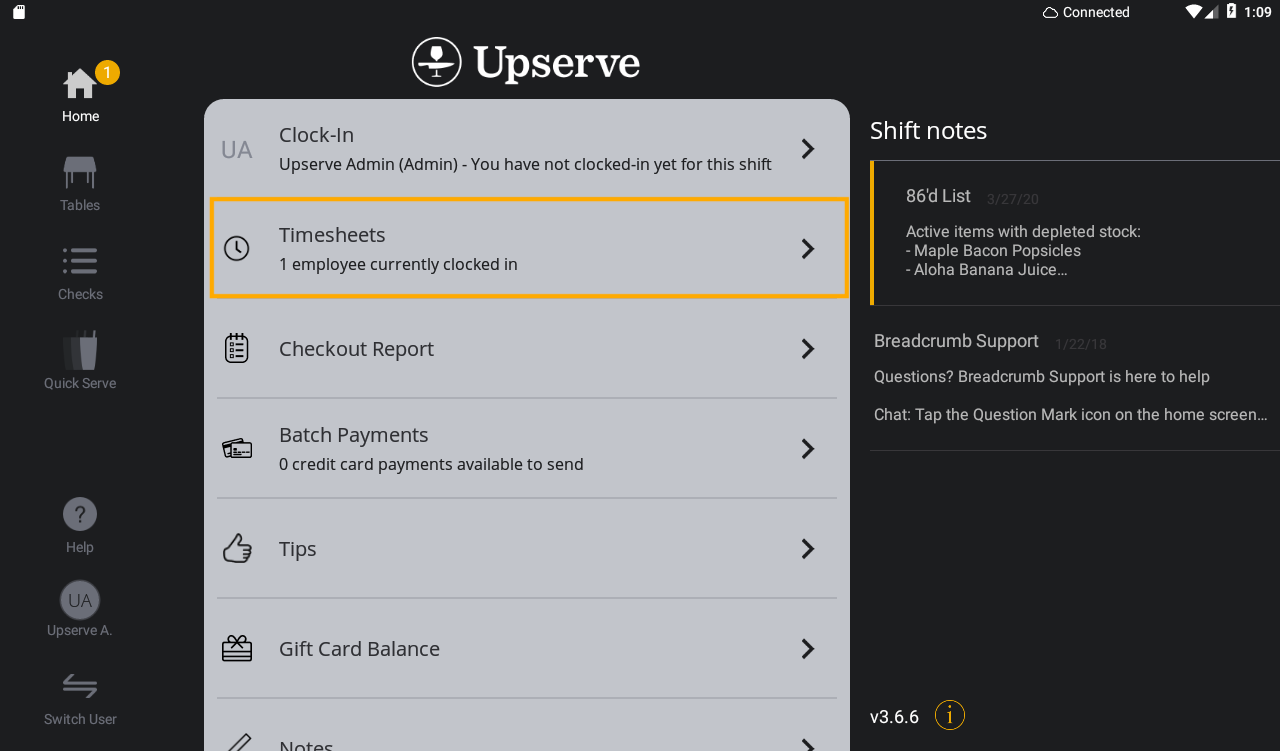
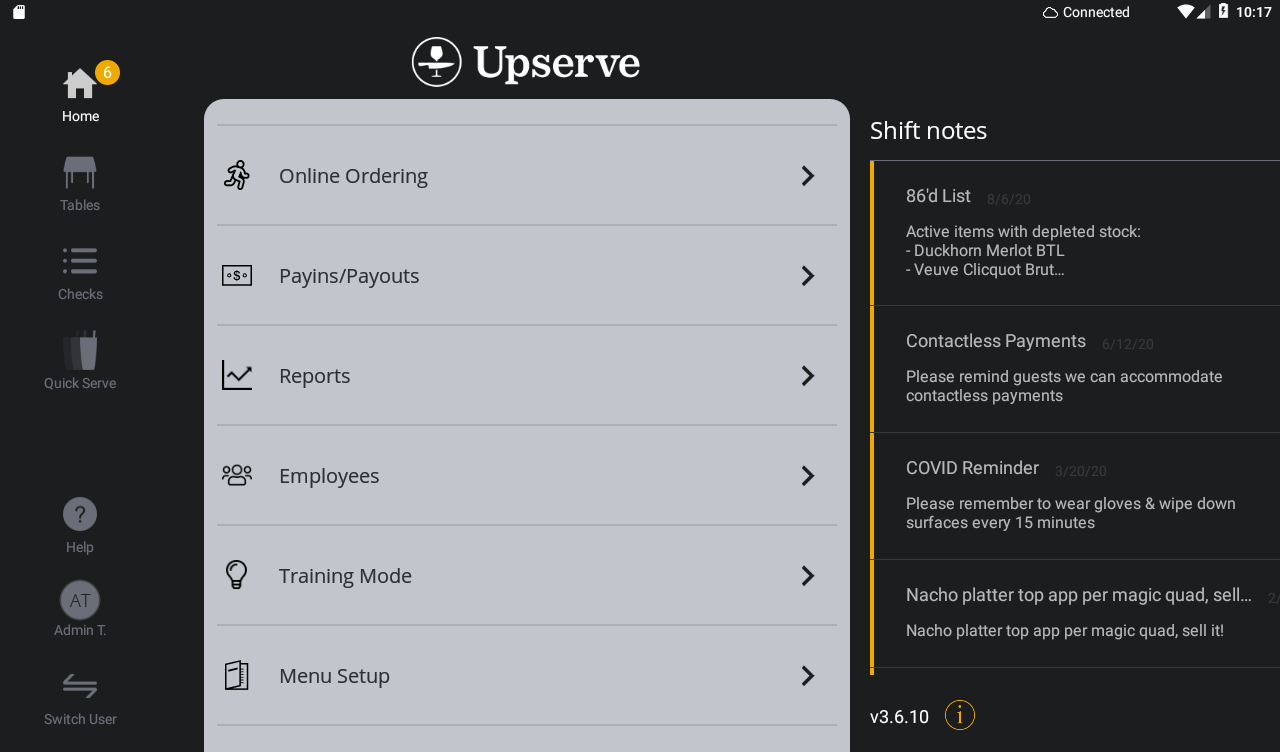
Managers/Admins set up roles and users in the system. You will receive a unique 4-digit pin number that you will use to pin in to the Upserve POS. Managers can also swipe to pin in to the Upserve POS using Manager Cards. Once you pin in to the app, you'll land on the default screen for your role. Managers/Admins typically are assigned the Home screen as their default screen.

(1) HOME: This button brings you to the home screen that you see above. On this screen Admins/Managers can access other Upserve POS screens (Tables, Checks, Quick Serve) and access the Home screen grey tile buttons, such as Tips, Gift Card Balance, Timesheets, etc.
(2) TABLES: Tap this icon to view floors plans and active tables for different Zones in your restaurant. You can also open new Table checks from this screen.
(3) CHECKS: Tap this icon to view a list of open and closed checks for all users. You can also open new checks, tabs, delivery and to-go orders from this screen.
(4) QUICK SERVE: Tap this icon to open a tab. Using the Quick Service screen to open tab after tab makes managing checks quick and easy for Bartenders and Cashiers.
(5) HELP, PROFILE, SWITCH USER: On the lower left of the Home screen you can tap the Question Mark to contact the Upserve Support Team for help. Tap on the initials icon to view your User Profile. Tap on 'Switch User' to return to the pin-in screen and allow another user to pin into the Upserve POS.
(6) INTERNET, BATTERY, DATE/TIME: At the top right of your terminal, you can see if your terminal is connected to the internet (or WiFi if terminal is wireless). This is important to pay attention to, to ensure that your terminal is online and not operating in Offline Mode. You will also be able to see the current Date/Time and if the terminal is charged (battery-life).
(7) SHIFT NOTES: On the right side of the Home screen, you can view Shift Notes that were added by Admins/Managers in your restaurant. Shifts Notes will also show any menu items that are 86'd (or out of stock) and will show upcoming Online Order Pre-Orders (if you allow pre-ordering in your restaurant).
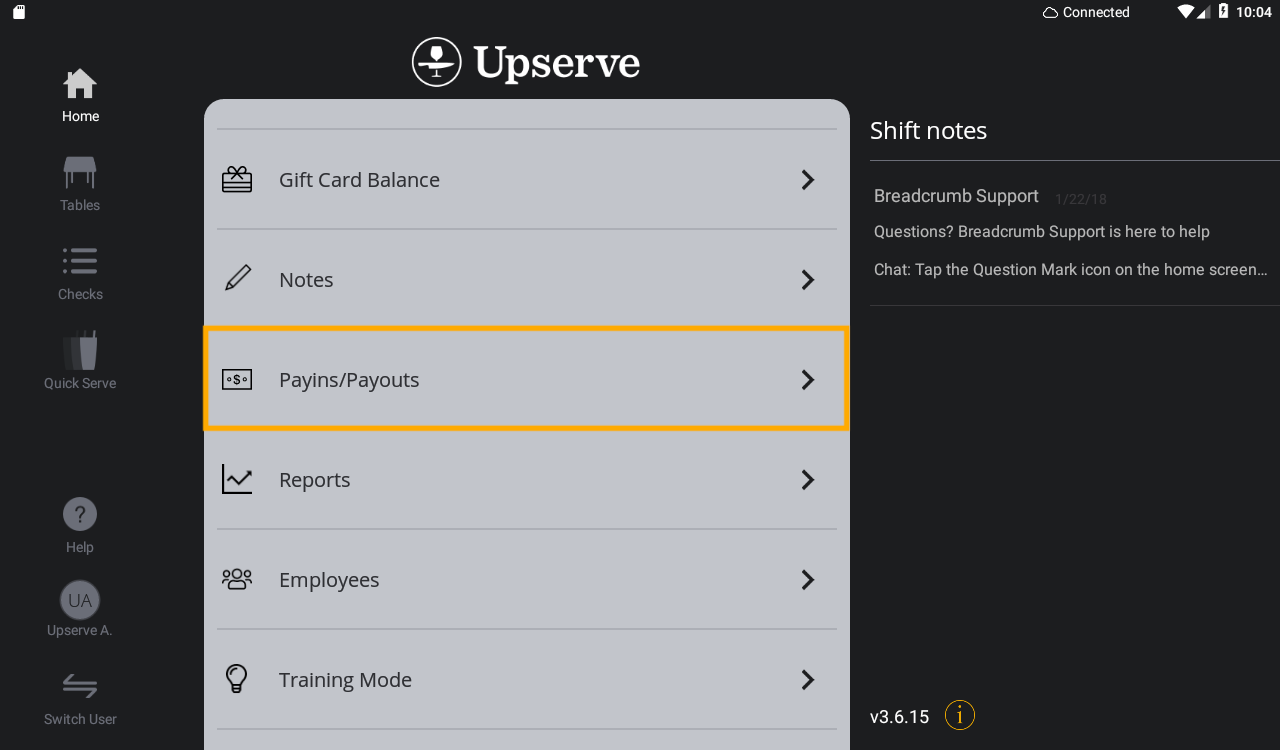
(8) HOME SCREEN TILES
On the Home screen, Admins/Managers will use the grey tiles to perform a number actions, such as adjusting timesheets, running checkout reports, managing printers, and more!
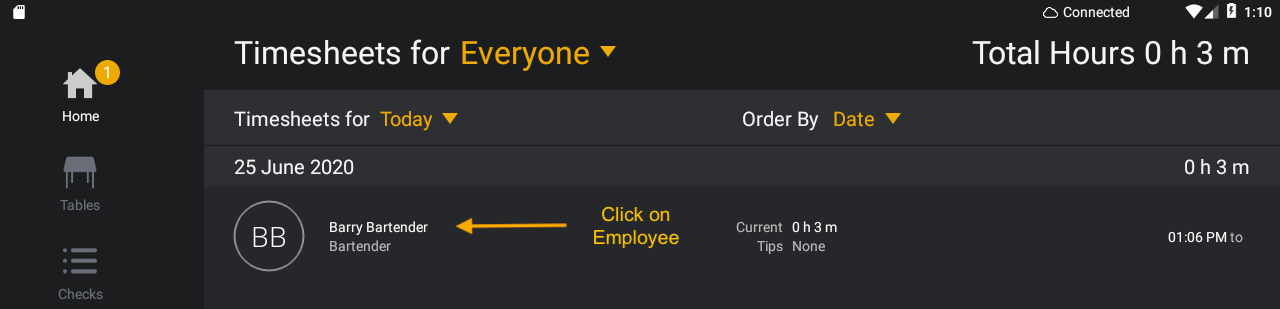
TIMESHEETS: Tap on 'Timesheets' to view clocked-in users on the Upserve POS. If you have permission to view/edit timesheets and run checkout reports for all users, you can tap on any employee to adjust their clock-in/clock out time and print their checkout report.
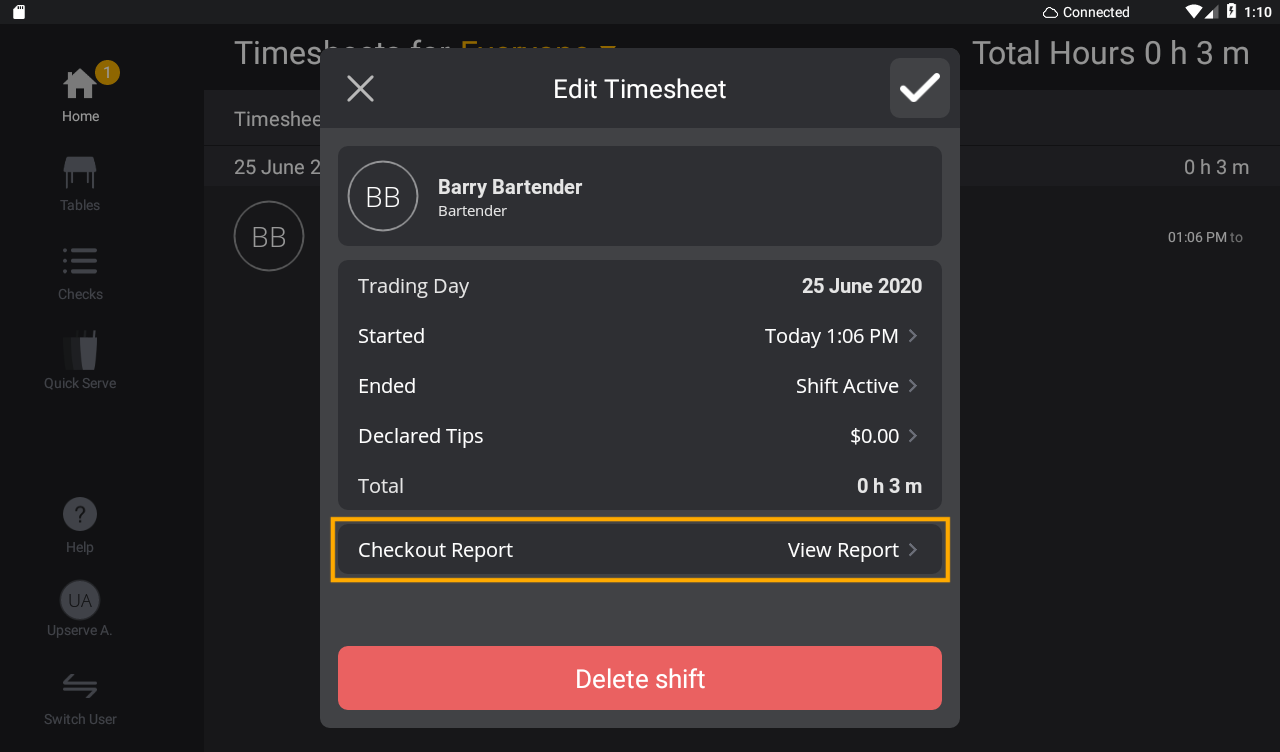
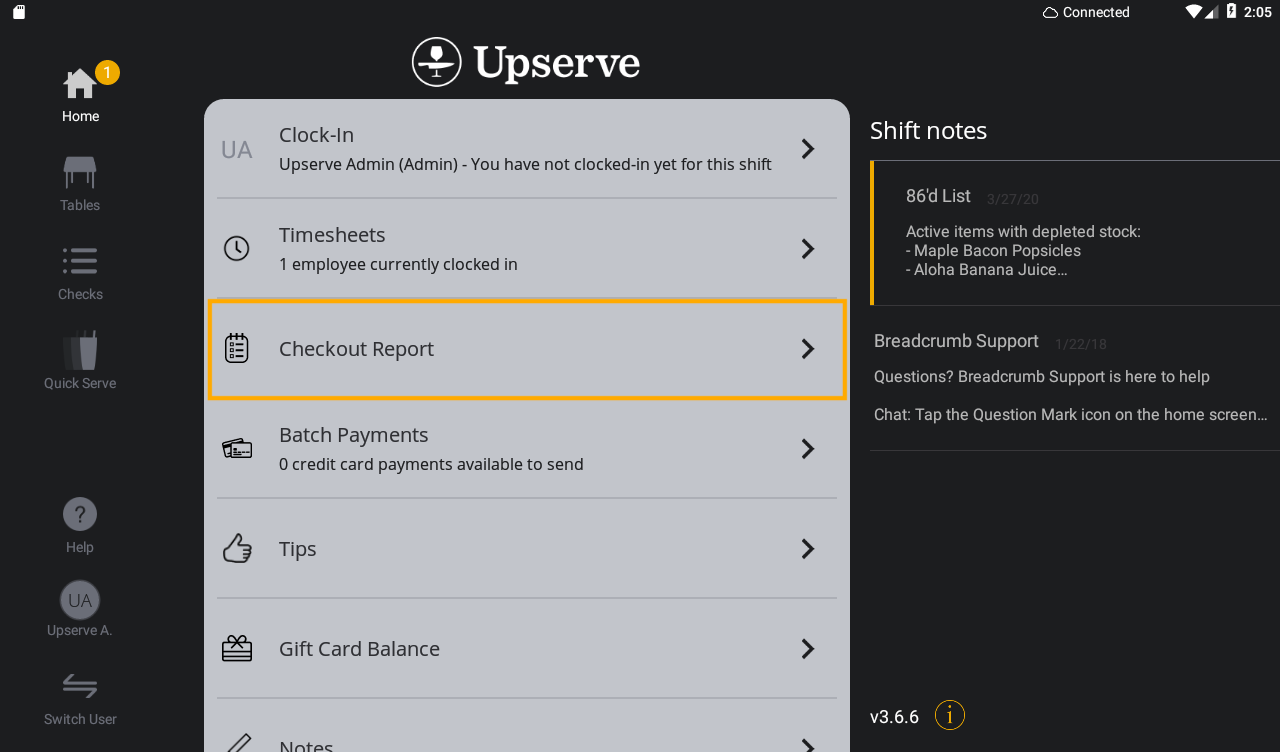
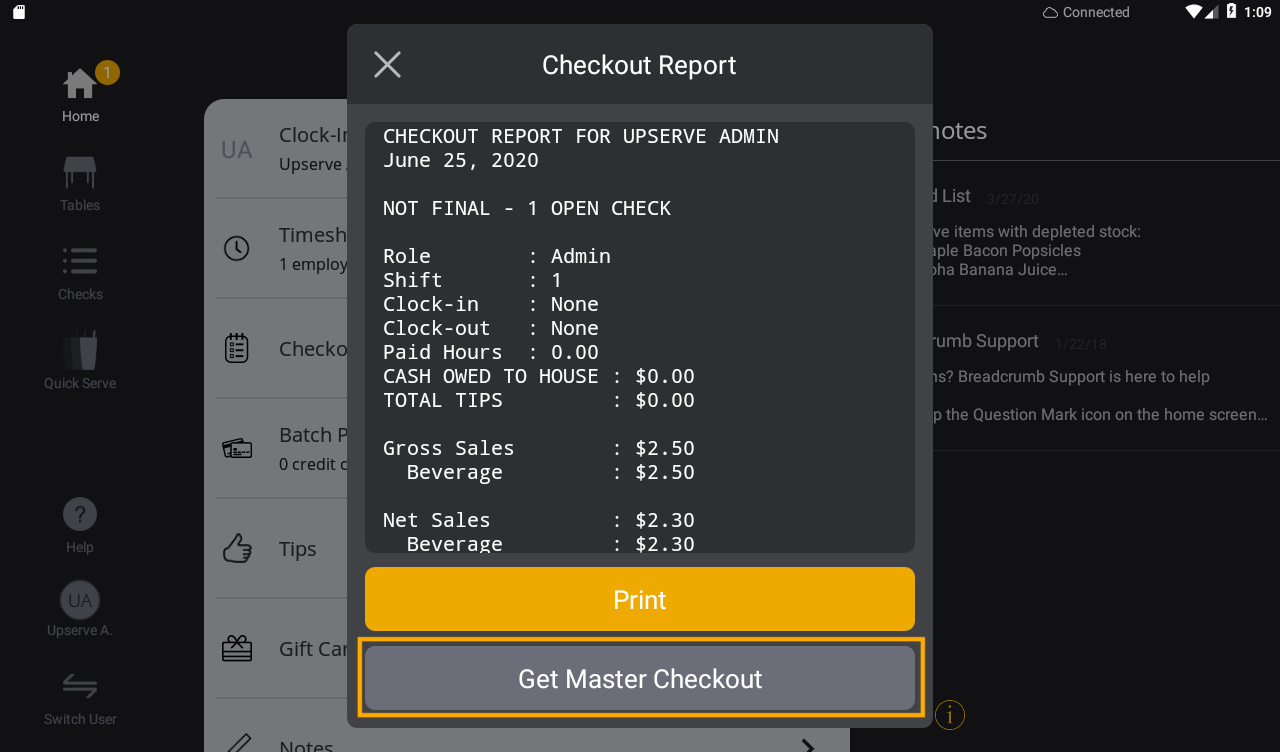
CHECKOUT REPORT: If you have permission to view/edit timesheets and run checkout reports for all users, you can view and print checkout reports for all staff members at the end of their shift by tapping on Timesheets. The 'Checkout Report' button on the Home screen will open your individual Checkout Report, which will show an overview of your check activity and sales for that shift. You can print your Checkout Report to the terminal receipt printer or you can tap on Get Master Checkout Report to view and print an overview of all check activity and sales on the Upserve POS for that shift.
BATCH PAYMENTS: At the close of the trading day, the Upserve POS will automatically send your credit card batch to be captured. If you need to manually send a credit card batch for processing at the end of service, you can also tap 'Batch Payments' then tap 'Send Payments.'
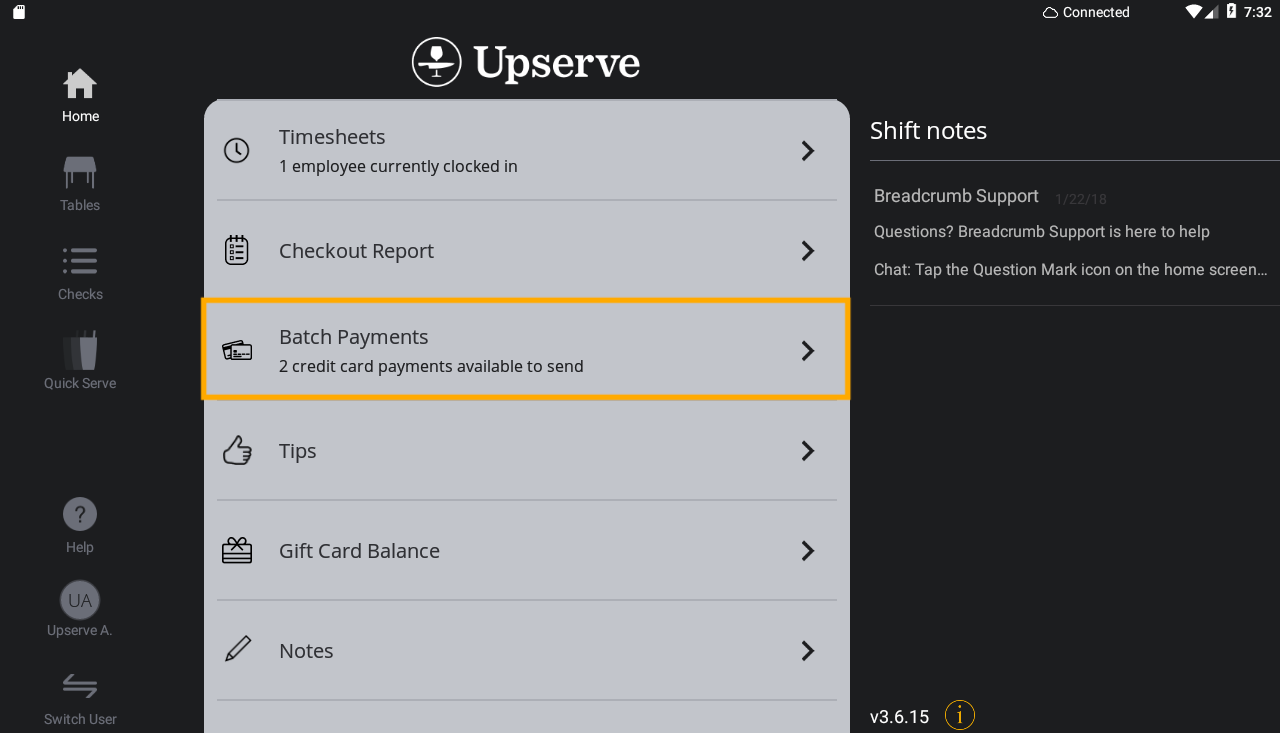
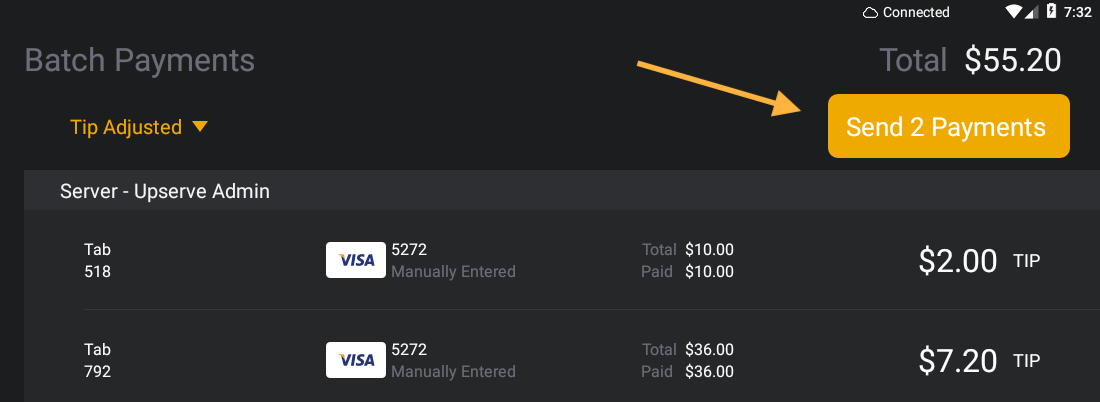
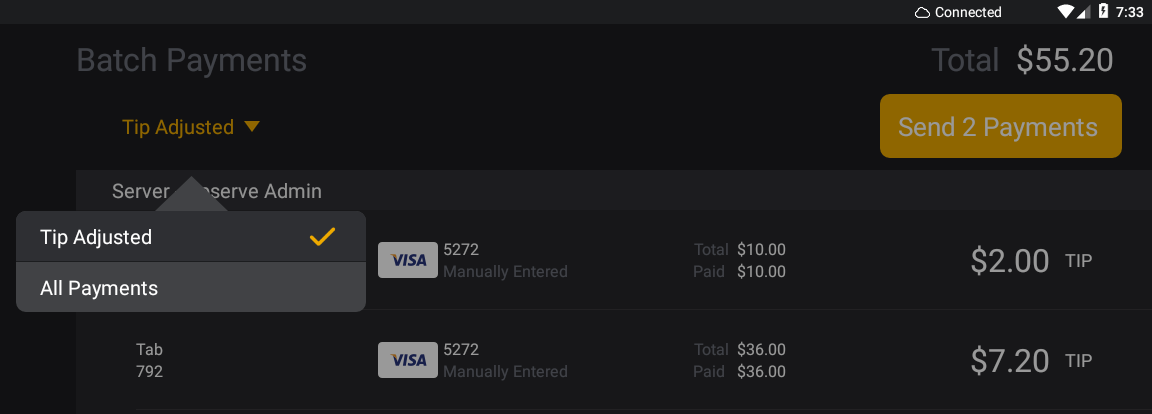
The Batch Payments screen will show a list of credit card transactions and details about each check (Ex: If it was a Tab/Table/To Go/Delivery Check, the Payment and Tip Amount, etc). The Batch Payments list can be sorted by 'Tip Adjusted' and 'All Payment' checks. Tap 'Tip Adjusted' to sort the transaction list.
If 'Tip Adjusted' is selected, the Batch Payments screen will only display transactions with tip applied, allowing you to only send credit card transactions that have tips applied for capture.
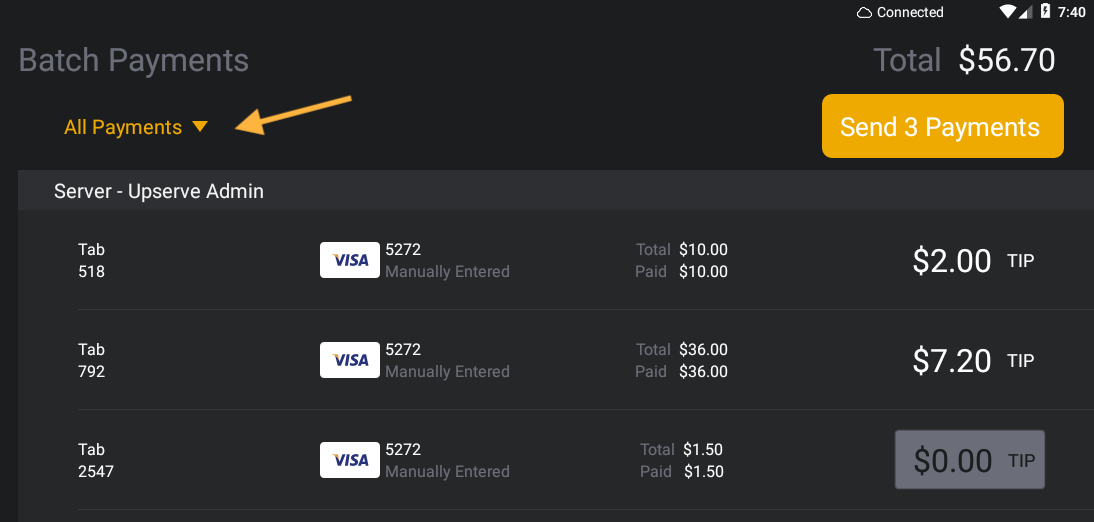
If 'All Payments' is selected, the Batch Payments screen will display all credit card transactions with tips or no tips applied. This allows you to send all credit card transactions for capture, including transactions with zero tips applied.
| Note: If you send your Batch before the trading day ends and proceed to take additional credit card payments, you will have two batches and two deposits for that trading day. If is recommended to allow the full trading day batch to capture automatically when the trading day ends or to manually send the batch when you are no longer in service and all checks have been paid/closed. |
To learn how to view your batch and deposit reports in HQ, click here.
TIPS: If you have permission to adjust tips for all users, you can tap on 'Tips' to view and adjust credit card and Other Tender tips for your clock-in staff. Cash tips can not be adjusted from the tips screen.
To learn more about how to adjust tips on the Upserve POS, click here.

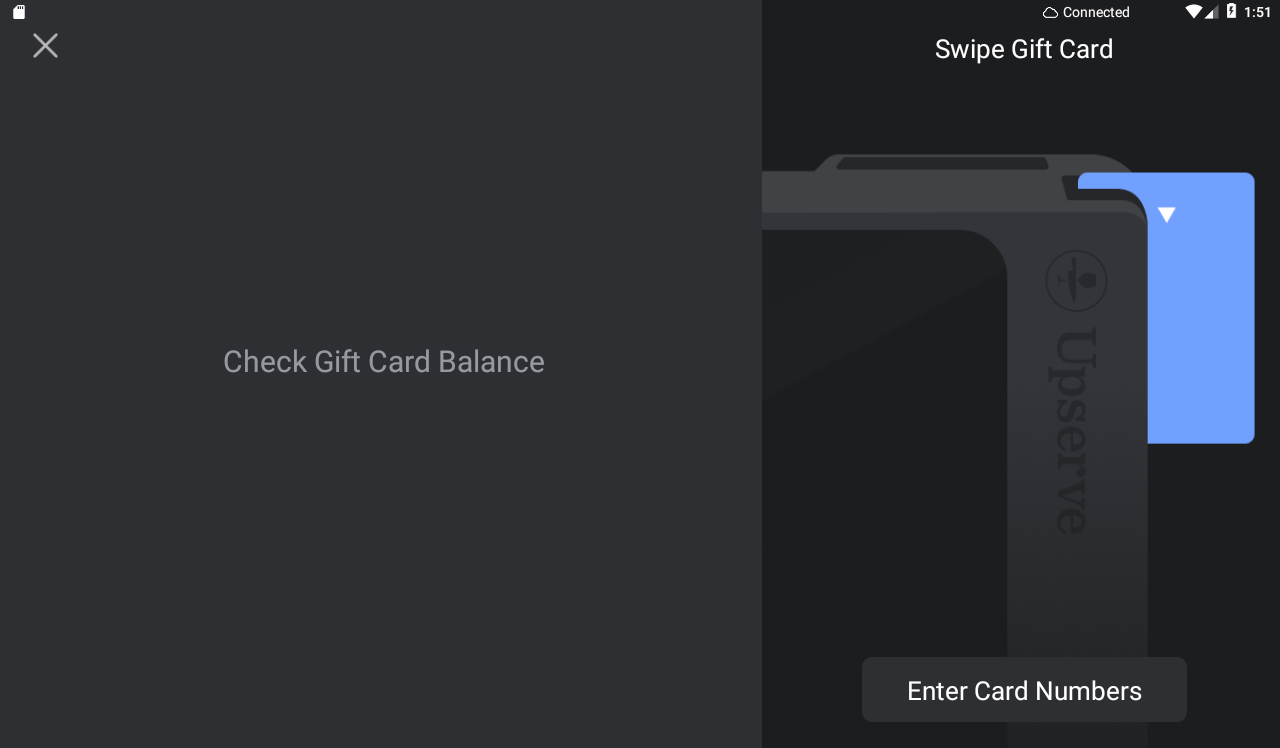
GIFT CARD BALANCE: If your restaurant sells and redeems integrated gift cards with the Upserve POS, you can tap 'Gift Cards' to check gift card balances for guests. On the 'Gift Card Balance' screen you can swipe the gift card on the terminal swiper or manually enter the gift card number to check the balance.
NOTES: If you have HQ Access permission to view/edit 'Notes,' you can create and manage the shift notes that appear on the right side of the Upserve POS Home screen. Tap 'Notes' to enter a new shift note, edit a shift note, or delete a shift note. Shift notes appear on the home screen of each Upserve POS in your restaurant and can be used to communicate shift prep work for the staff, specials that the staff should verbal, and more!
To learn how to create and manage shift notes, click here.
ONLINE ORDERING: If you use Upserve Online Ordering, Grubhub or Chowly through the Upserve POS, you will be able to view online orders by tapping on the 'Online Order' button. You can also temporarily pause online ordering from this screen. Before pausing online ordering, review Pausing Online Orders to understand what happens when you pause orders and how to avoid losing orders.
PAYINS/PAYOUTS: If your restaurant uses Upserve cash drawers and accept cash payments, you can tap the Payins/Payouts button to record when a user adds or removes cash out of the cash drawer (unrelated to Upserve POS tips and sales).
The Upserve POS calculates you cash deposit and cash owed to staff automatically on the Master Checkout Report and on your HQ Sales Report, so you should not use 'Pay Outs' for recording tip pay outs to staff. If a payroll error occurs outside the Upserve POS, you can use 'Payouts' to record when you give cash to an employee for hourly pay or tips. The 'Payout' will not adjust the employee's total pay or tips for the trading day and is only intended to note why cash was taken out of the cash drawer.
Example Payout: You need to give $20.00 to the barista to buy whole milk at the corner market and you take it from the cash drawer.
Example Payin: The barista returns with the milk and brings you the change. You put the change back in the cash drawer. |
To learn more about Payins/Payouts, click here.
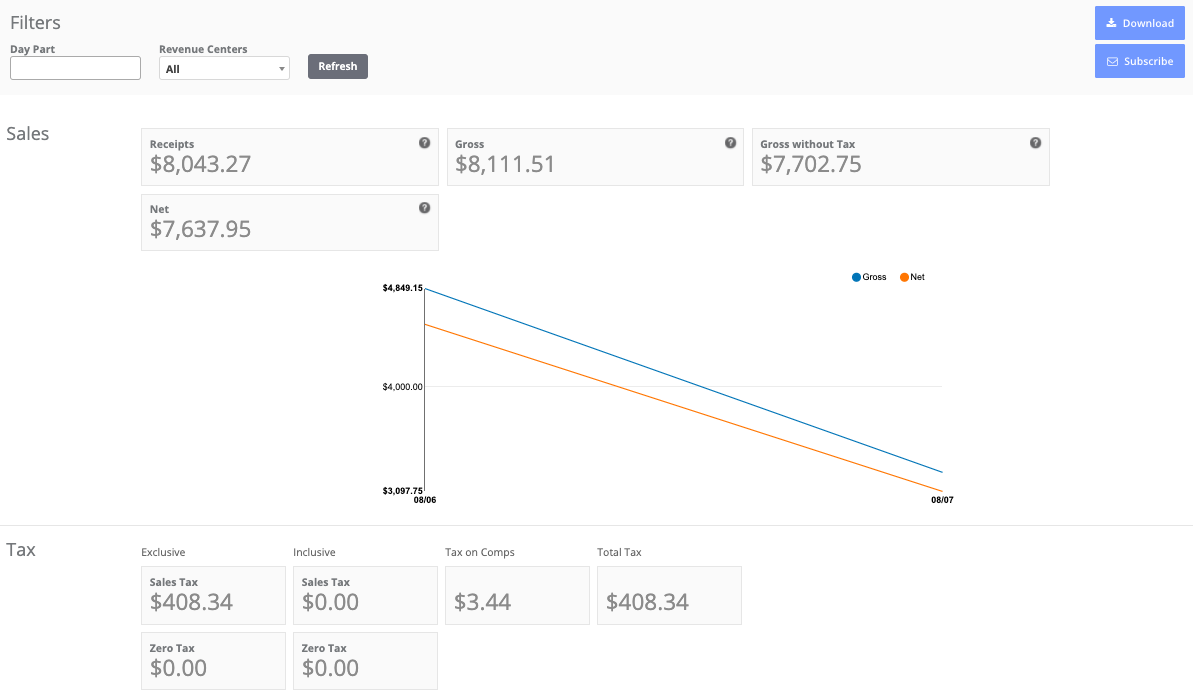
REPORTS: If you have HQ Access permission to view 'Reports', you can tap 'Reports' to open the 'HQ Reports' page. The first report you will see will be the Sales Report, but you can tap on the report name to select a different report to view. If you need to download specific reports, it is better to login to HQ > Reports from a computer.
To learn about Upserve POS reports, visit the Upserve POS Reports Overview.
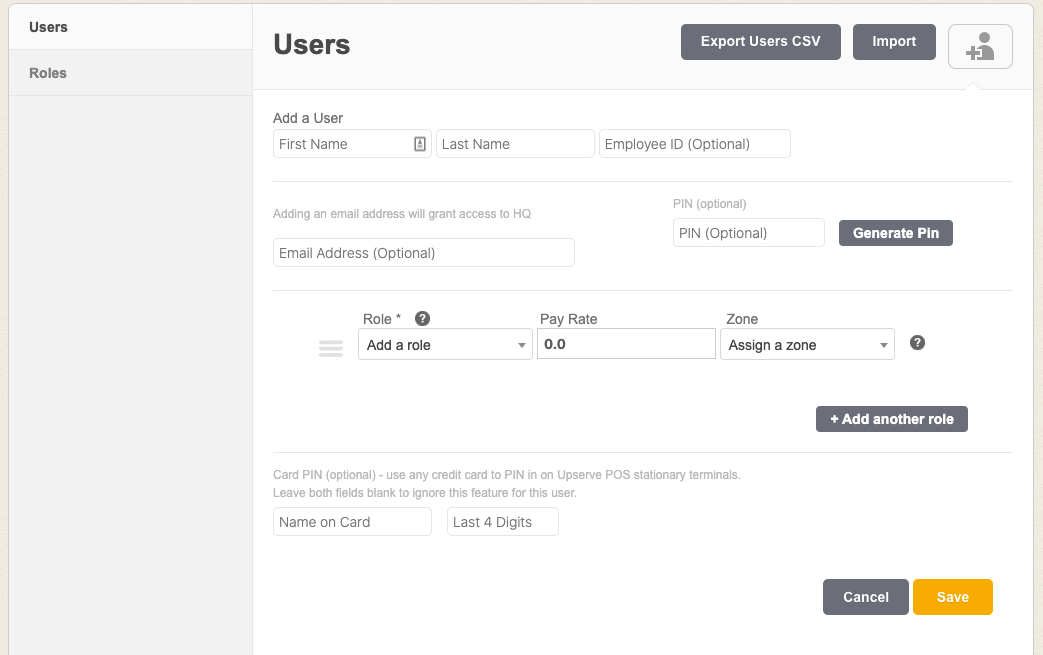
EMPLOYEES: If you have HQ Access permission to view/manage 'Users', you can tap 'Employees' to open the 'HQ Users/Roles' page. To 'Employees' to add a new employee or edit an existing employee's user profile. You can also create and edit Upserve POS roles from this page.
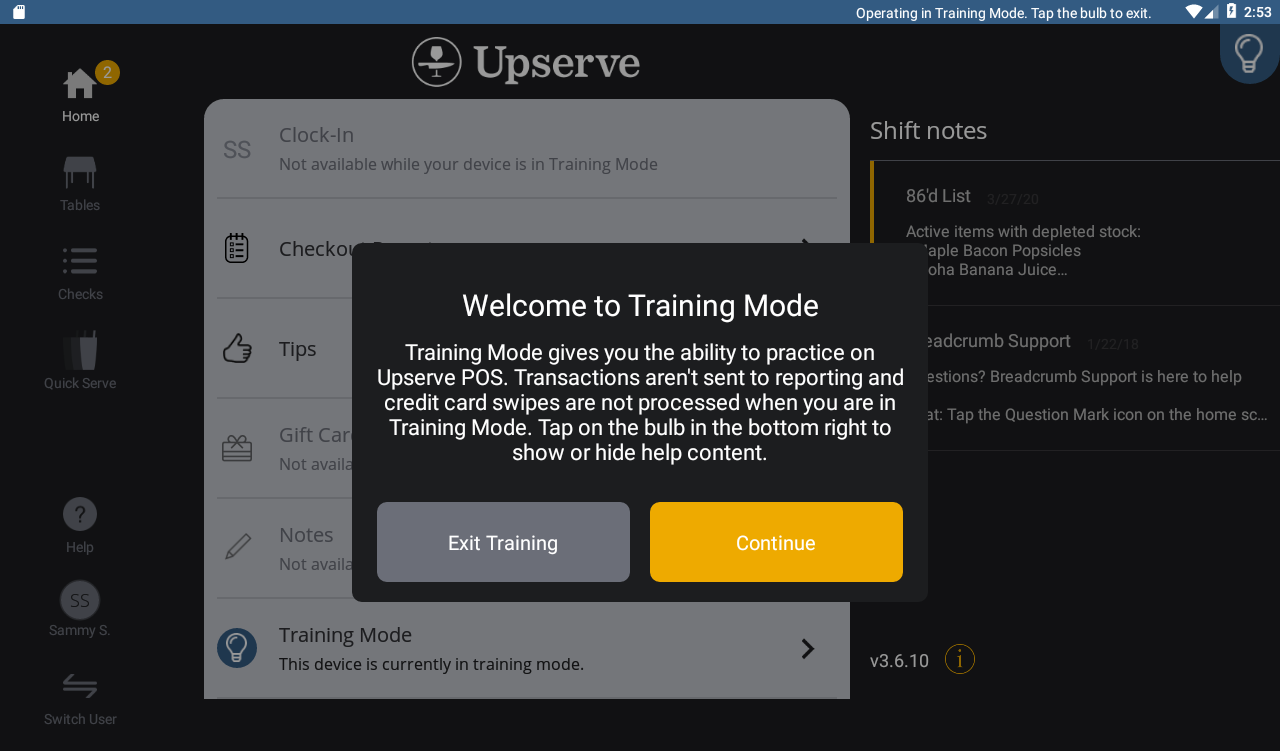
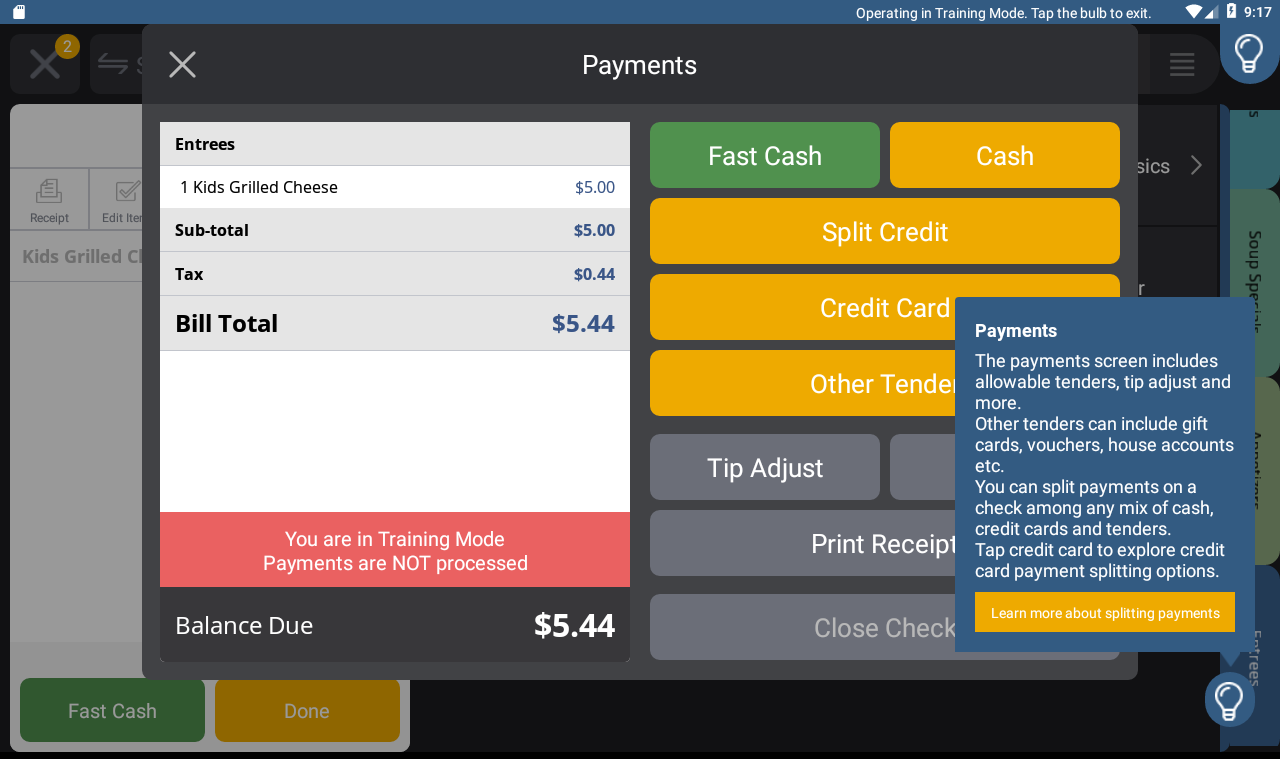
TRAINING MODE: When you are first getting started with the Upserve POS, you can tap on 'Training Mode' from the Home screen to open a sandbox POS environment. In Training Mode, you can practice Upserve POS workflows, such as creating/managing checks and taking payments. Each training screen will have helpful text that guides you through each workflow on the Upserve POS.
All users have access to 'Training Mode,' but you can require 'Manager Approval' for a user to enter Training Mode on the Upserve POS.
To learn more about 'Training Mode' and setting up 'Training Mode approval,' click here.
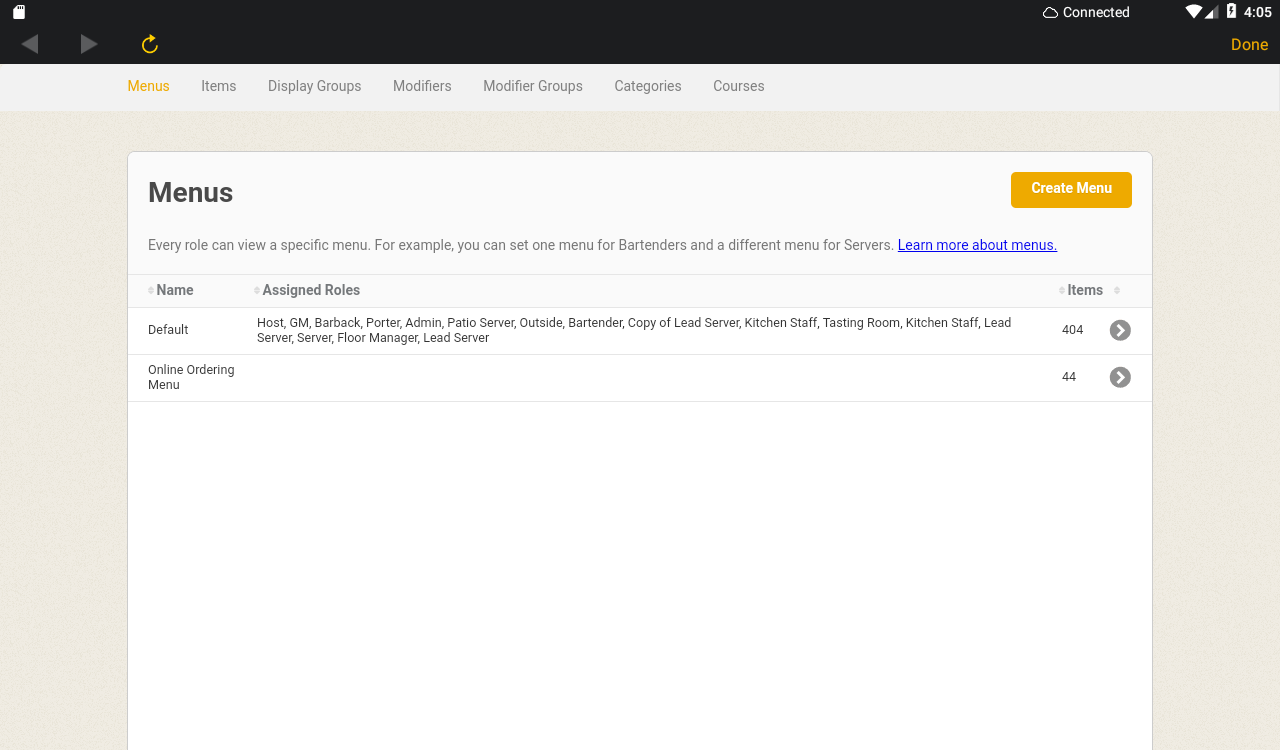
MENU SETUP: If you have HQ Access permission to view/edit 'Menus', you can tap 'Menu Setup' to open the 'HQ Menus' page. On this page, you can navigate through Menus, Items, Display Groups, Modifiers, Modifier Groups, Courses, and Categories to make menu changes.
If you are making extensive menu edits or want to make mass edits using a CSV file, you should login to HQ > Menus on the a computer to work on menu edits.
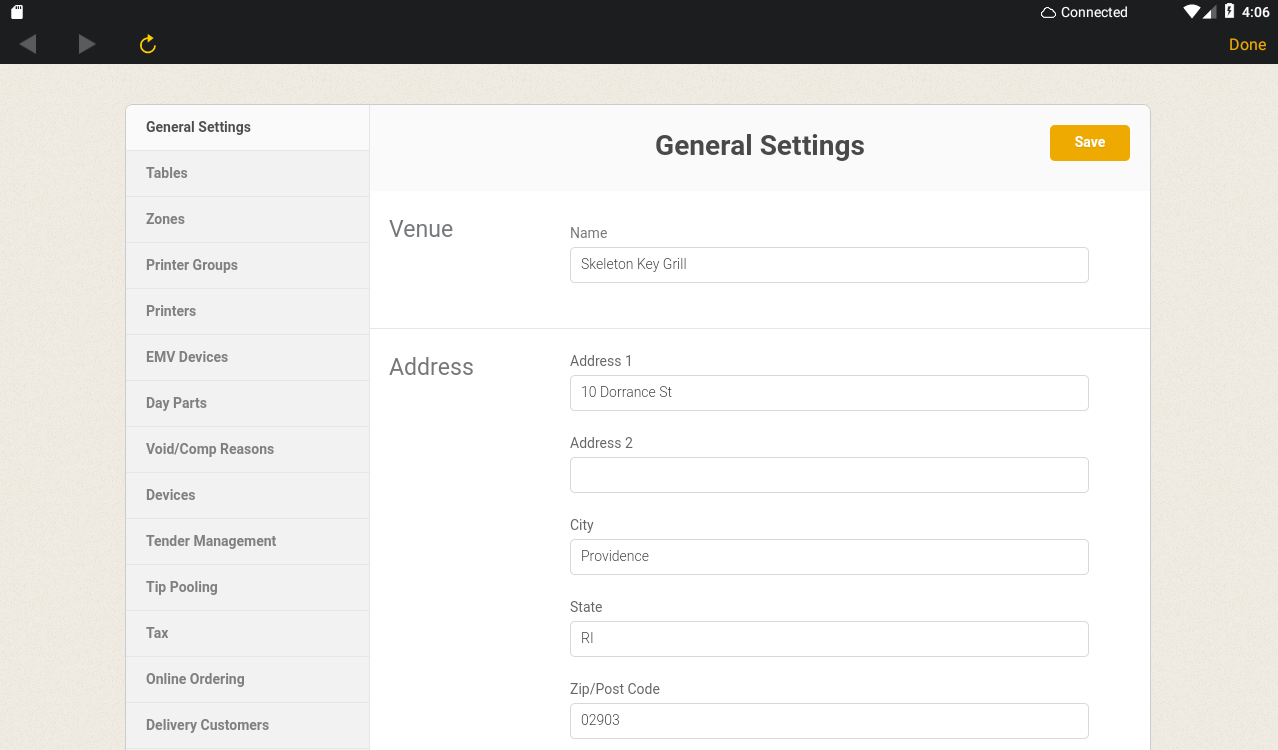
SYSTEM ADMIN: If you have HQ Access permission to view/edit 'Settings,' you can tap 'System Admin' to open your HQ 'General Settings' page. On this page you can turn on or off Upserve POS settings, adjust your receipt header/footer text, and more!
To learn more about Upseve POS General Settings, click here.
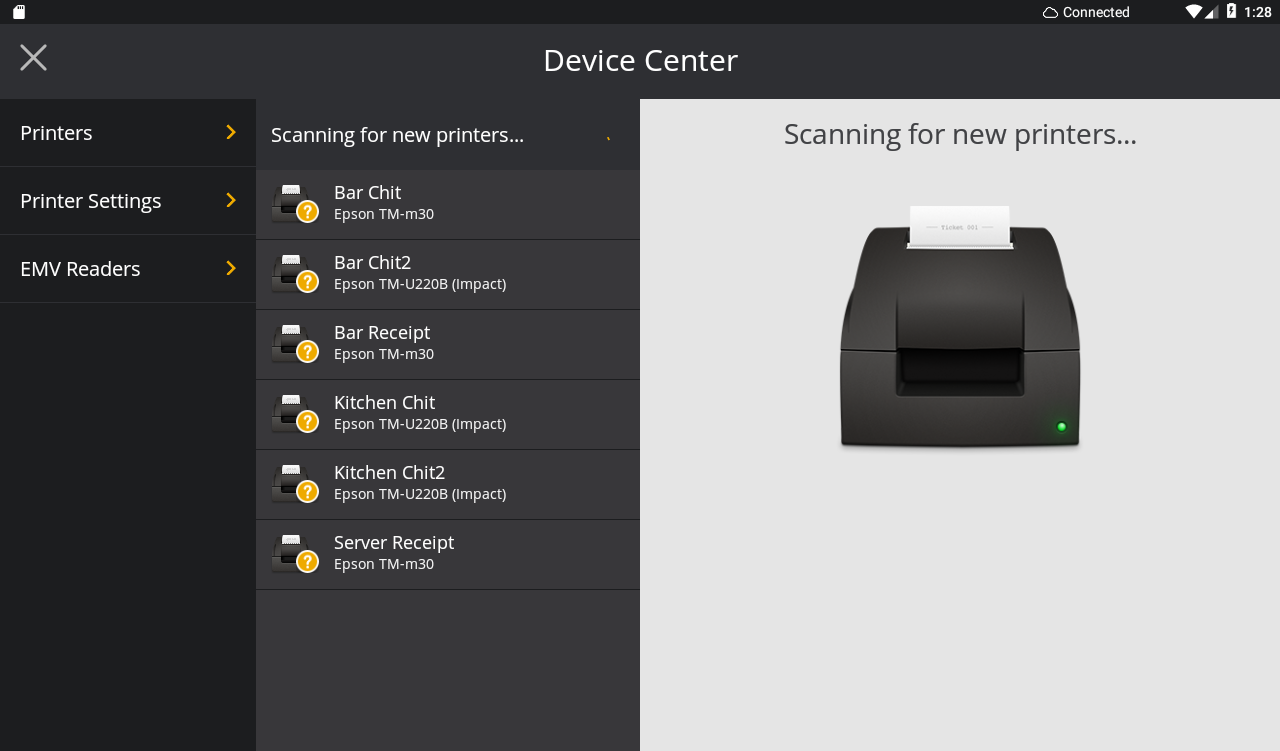
DEVICE CENTER: If you have HQ Access permission to view/edit 'Settings,' you will have access to open 'Device Center.' In 'Device Center' you can manage your terminal printers and EMV reader.
To learn how to set up printers on the Upserve POS through Device Center, click here. To learn more about Device Center Printer Settings, click here.
To learn how to connect an EMV Reader to an iOS terminal through Device Center, click here.
DEACTIVATE DEVICE: If you have HQ Access permission to view/edit 'Settings, you will be able to tap on the 'Deactive Device' button to return the Upserve POS all to the email login screen. You can tap 'Deactivate Device' if you would like to remove a terminal from service temporarily.
.
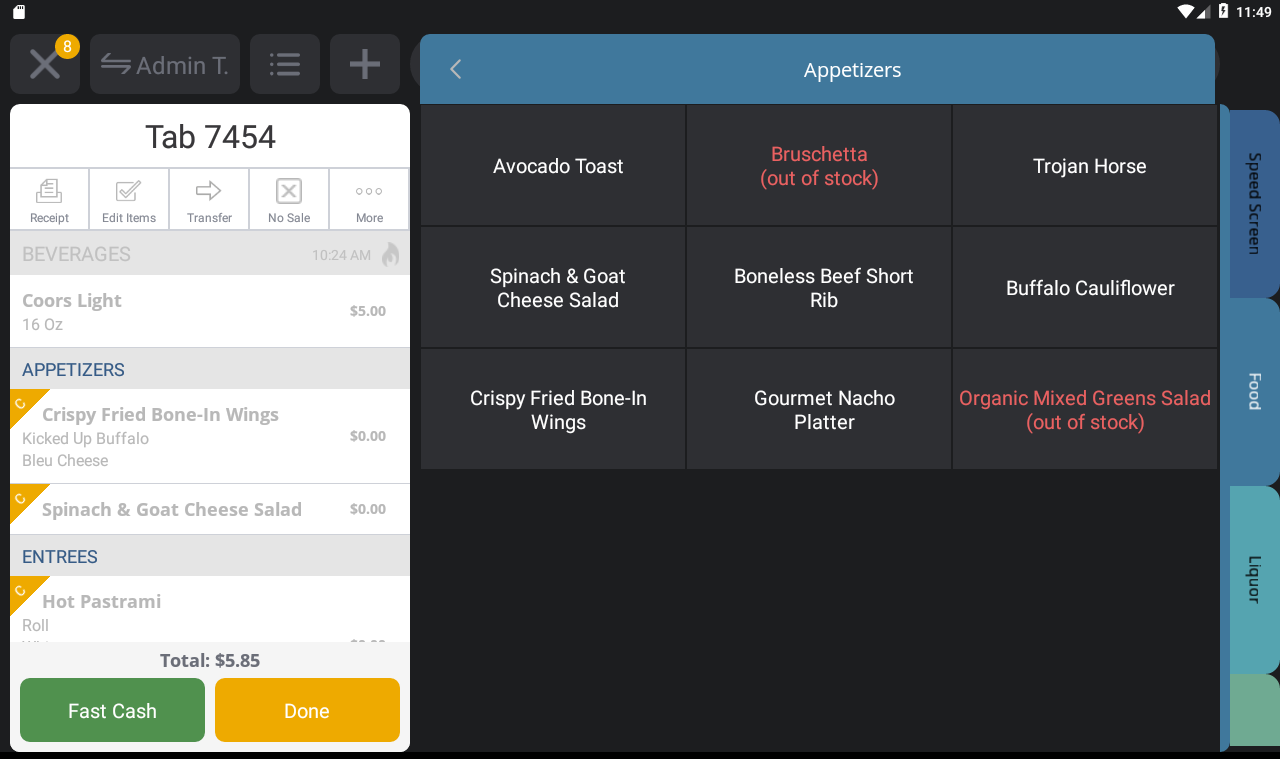
Managing Checks & Payments
Manager/Admin roles typically are set up to have all or mostly all HQ and Upserve POS permission enabled, including 'Supervisory Functions' such as apply voids/comps, reopen checks, apply refunds, etc.
Apply Voids/Comps
After a check is sent to the kitchen/bar or another station for preparation, items can not longer be removed from the check without applying a Void or a Comp.
Voids
For items that were never prepared, you will apply a Void, since no ingredients or money was lost. Voids are typically applied to items that were added to the check incorrectly or by mistake.
Comps
For items that were prepared and served to a guest, you will apply a Comp, since ingredients were used and the restaurant covers the cost of the items. The Upserve POS allows full comps or partial comps to be applied to items using a fixed dollar amount or percentage. Comps are typically applied to items when there is a service complaint. Comps can also be used for item-level discounts, such as a Senior discount, or applied to items given to guests for free, such as a free appetizer for a VIP guest.
To learn how to apply a void/comp to an item or a check, visit Void and Comp Items and Checks.
Reopen Closed Checks & Apply Refunds
Mistakes happen and checks can be easily fixed or adjusted before the trading day closes. To learn how to edit payments on checks, reopen closed checks and apply refunds, visit Edit, Refund and Remove Payments on the Upserve POS. This article also reviews how to apply tip adjustments and refunds on checks after the trading day has passed and is a wonderful resource for new managers.
Apply Manual Gratuity & Tax Exempt
If you have the HQ Role permission to 'override the default gratuity on a check' you will be able to apply a mandatory gratuity of any percentage to a check. You will need 'Automatic Gratuity' turned on in your HQ General Settings to be able to apply mandatory gratuity to a check.
| Example: Let's say you have the 'Automatic Gratuity' setting turned on and set to apply 20% gratuity to checks with a guest count of 20 people. If a party of 16 people walks in and dines at the restaurant, a Manager/Admin can edit the check details to manually apply a 20% (or any percent of their choosing) to the check. This is an optional feature and can be used for the specific needs of your restaurant or not used at all. |
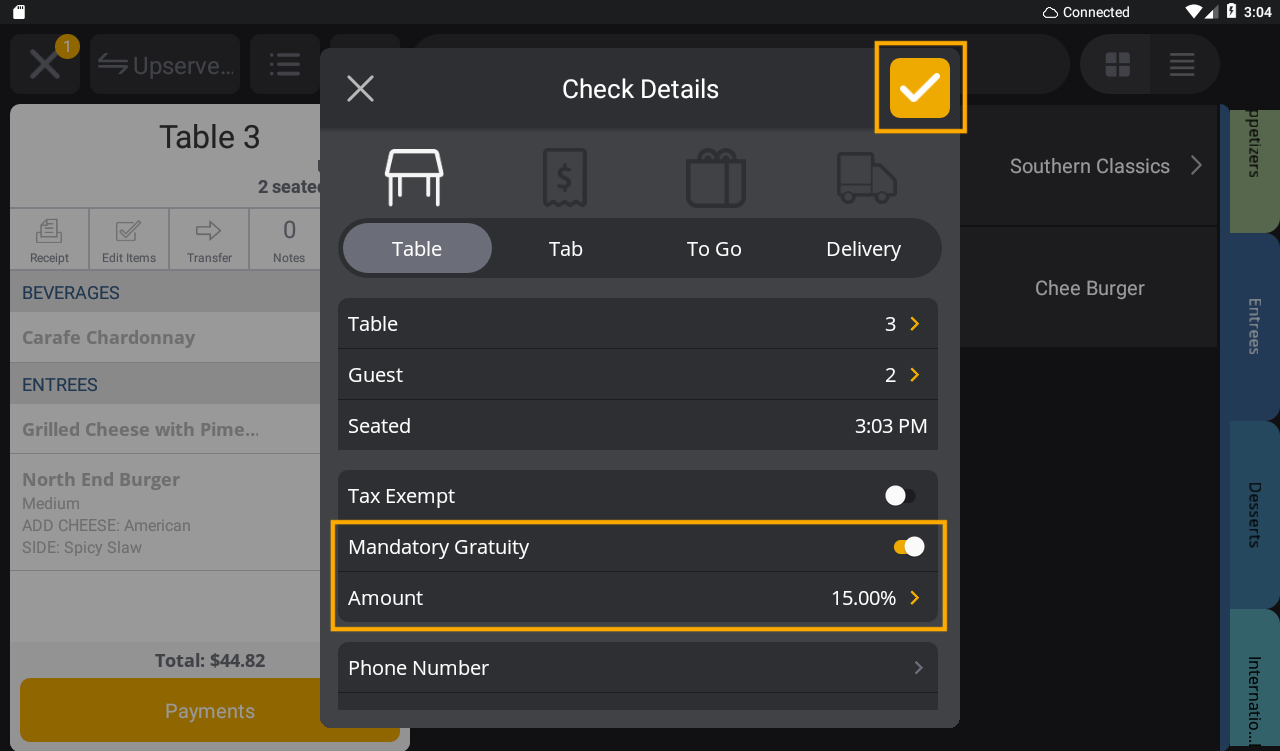
Apply Mandatory Gratuity
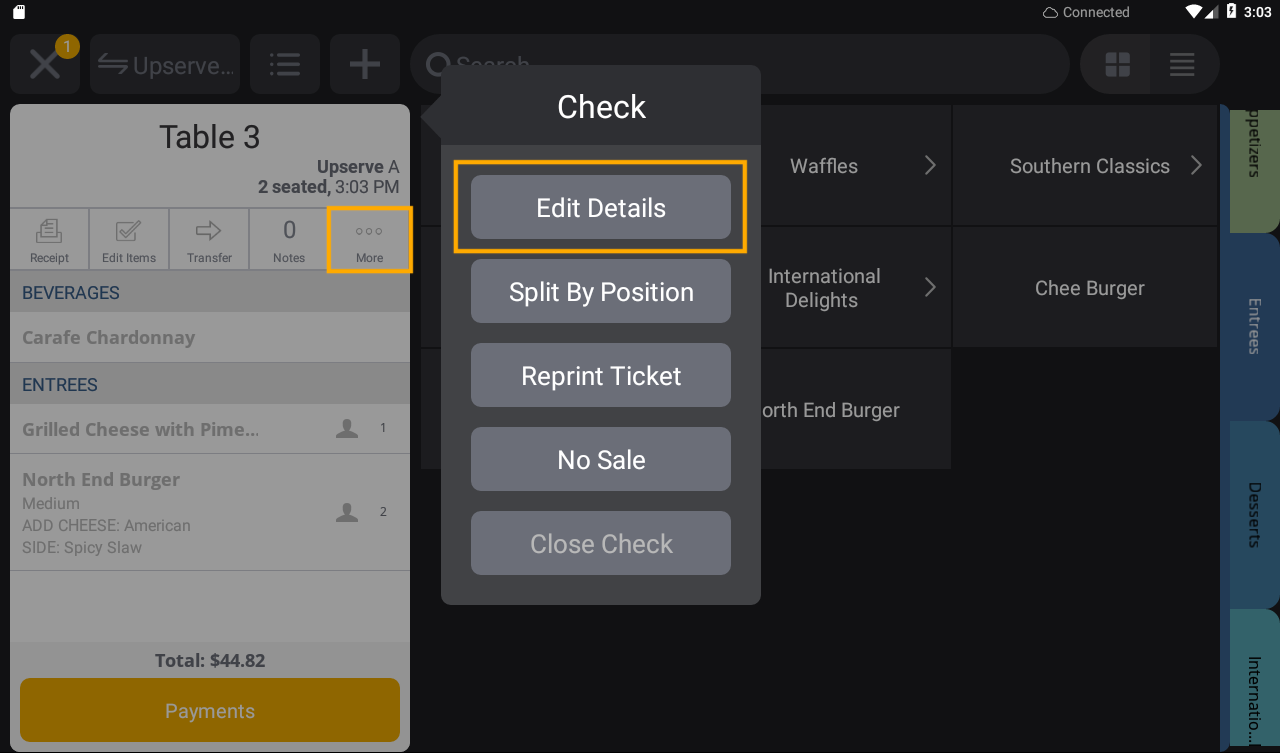
- On the check you wish to edit, tap More
- Tap Edit Details
- Toggle on 'Mandatory Gratuity'
- Tap on the percentage to enter the gratuity percentage
- Tap the orange check mark to Save
- Tap payments to view the gratuity percentage applied to the check total
If you have the HQ Role permission to 'approve tax exempt,' you can apply a tax exemption to a check if a guest presents a tax exemption card.
Apply Tax Exempt
- On the check you wish to edit, tap More
- Tap Edit Details
- Toggle on 'Tax Exempt'
- Tap the orange check mark to Save
- Tap payments to view the check balance (the tax will say 'Exempt' and be zero)

Upserve POS Common Issues & Troubleshooting
Upserve POS - Offline Mode
The Upserve POS is cloud-based point of sale that relies on a reliable internet connection to sync check data with other terminals. If the internet connection at your restaurant fails, the Upserve POS will operate in Offline Mode.
It is important to understand how the terminal works in offline mode and what you can and cannot do on the Upserve POS while it is offline. Review these articles to learn how to use the Upserve POS during offline mode:
Printer Troubleshooting
There may be a time when a printer or printers stop printing during service. Before contacting Upserve Support, there is basic troubleshooting you can do to get your printer printing again! Visit these articles to learn what printer troubleshooting you can attempt on your own:
End of Service: How to Close Out Like a Boss
The only thing that can make a late-night close worse? Technical difficulties. We’ll walk through everything you need to close out like a boss and make the next shift manager wonder how you get it done.
In this video, an Upserve Technical Account Manager will walk you through your close-out checklist and review:
Upserve Live App
Admins/Managers who want to keep track of Upserve POS reports on the go can download the Upserve Live app for free! Upserve Live allows you to track sales and other KPIs with week over week comparisons, and monitor voids, comps and more.
On your smartphone, visit the app store to download Upserve Live. When you open the app, login with your HQ email/password.
To learn more about Upserve Live, click here.

Upserve Mobile App
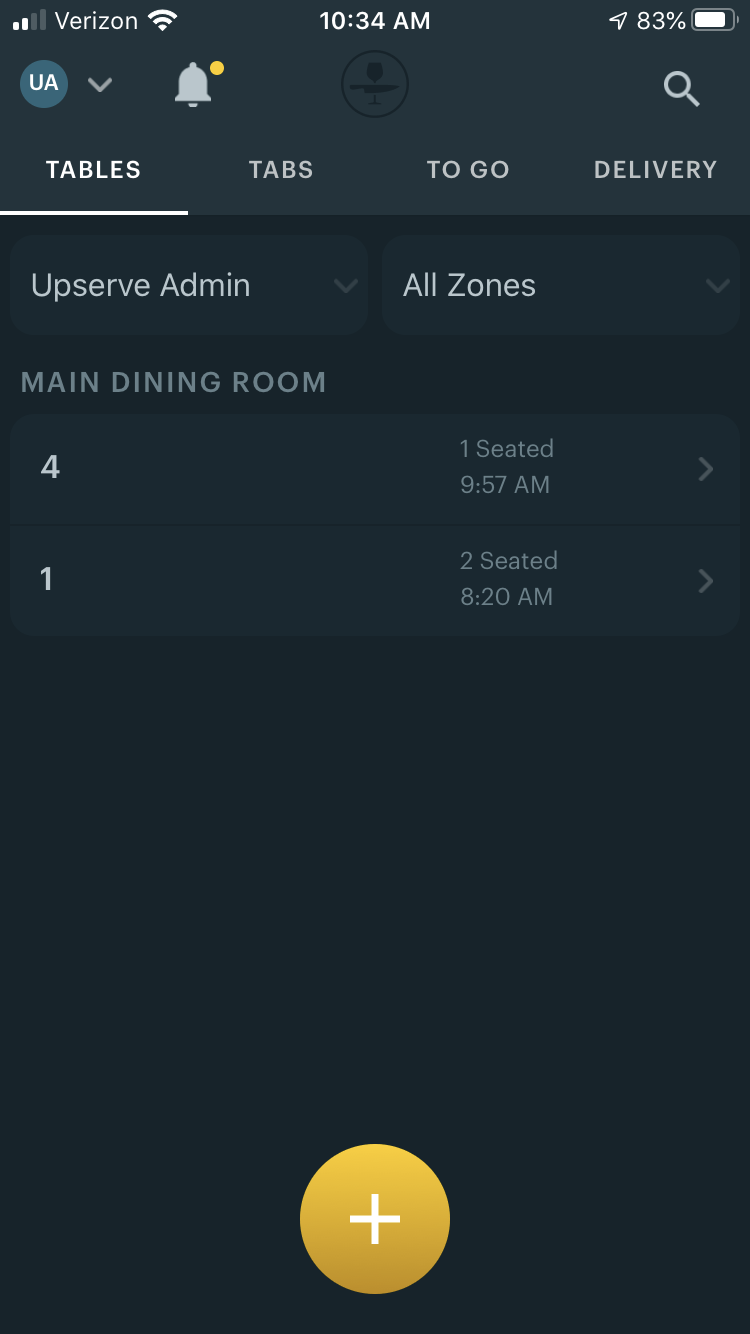
See exactly what is happening in your restaurant through your phone with the Upserve Mobile app! With Upserve Mobile, Admins/Managers can view open and closed closed checks on your Upserve POS, without needing to be in the restaurant! You can also use Upserve Mobile to create and manage checks for off-site events.
When you download Upserve Mobile from the App Store or Google Play, you will need to turn on the 'Login to Upserve Mobile' role permission before you can log into the app. This ensures that only users in specific roles can log in to the app. (Note: If you are assigned to the 'Admin' role, this permission will automatically be turned on for you role). When you open the app, login with your HQ email/password.
To learn more about Upserve Mobile, click here.