When you are first getting started with the Upserve POS, you will be responsible for setting up your tax rates and tax settings. Review this article to learn how to set up tax rates and how to customize you Upserve POS tax settings. We recommend consulting a tax expert to make sure you are setting up your taxes correctly for your business.
Set Up & Manage Tax Rates
Assigning Tax Rates to Items
Using Multiple Tax Rates
Tax Exclusive & Inclusive Tracking
Assigning Tax Exclusive/Inclusive Tax Type to Categories
Tracking Taxes on Comps
Tax Exempt Checks
Tax Calculation on the Upserve POS
Tax Reporting
Set Up & Manage Tax Rates
Tax rates are assigned to your Upserve POS menu items. Before you can assign tax to your items, set up your tax rates in
HQ.
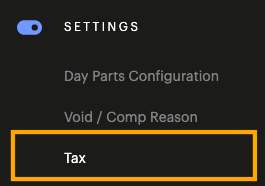
- Log in to HQ
- Click Settings > Tax

- Create a Name for the tax
- Enter the Tax Rate
- Click Save
| Note: If you are unsure what tax rate(s) to create for your business, consult a tax expert. |
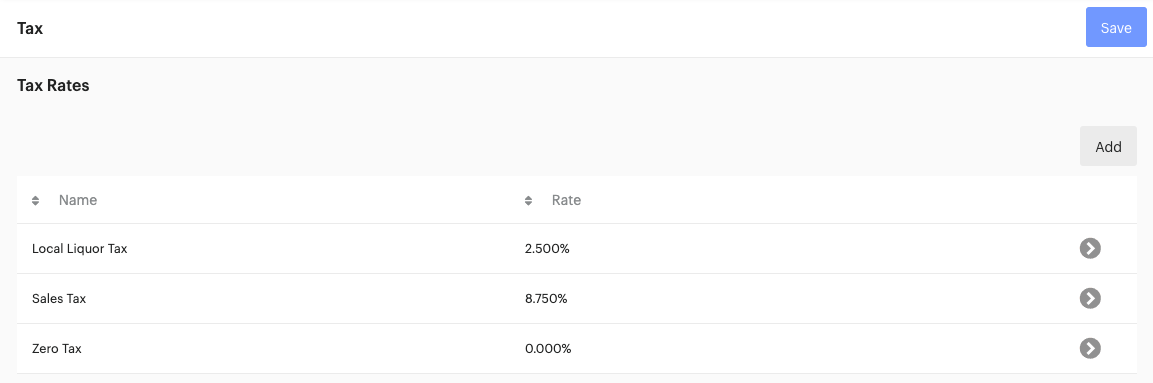
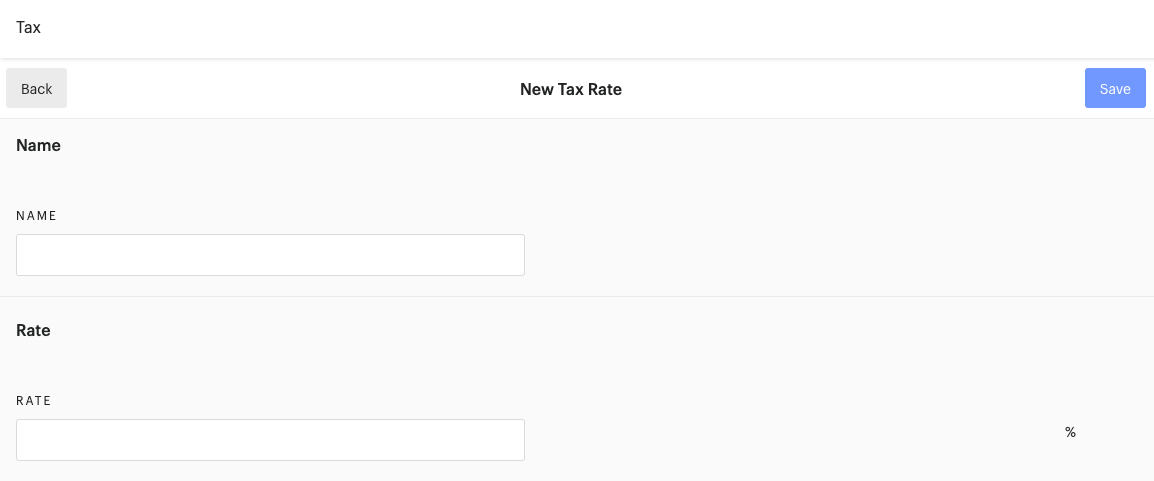 Example Tax Rates Page
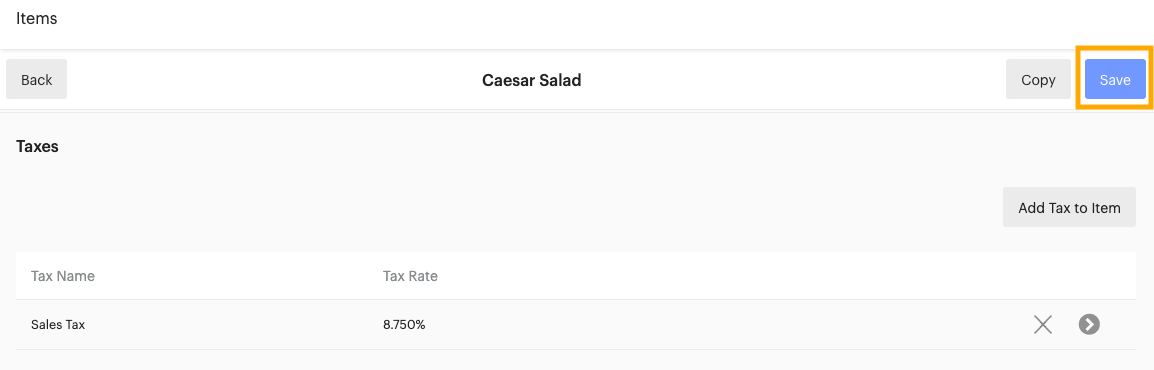
Assigning Tax Rates to Items
After you have created your tax rates, you will need to assign tax rates to any revenue items menu items. Non-revenue items, such as Deposits and Gift Cards, should have zero tax applied.
To learn how to create and edit items, click here.
To learn how to set up non-revenue items, click here.
To assign a tax rate to a normal item (revenue item), follow these steps:
- In HQ, click Menus > Items
- Click on the item you wish to edit
- Scroll down to Taxes
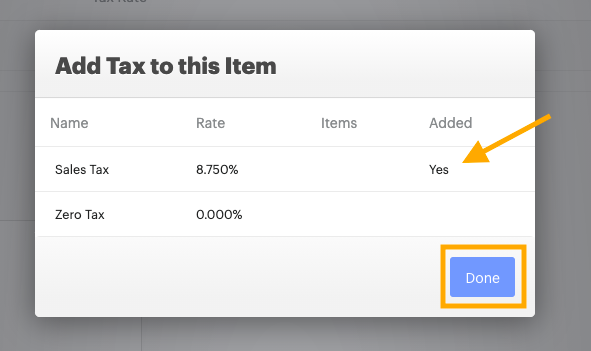
- Click Add Tax to Item

- Click on the tax rate you wish to assign until it says Yes
- Click Done
- Click Save after you have finished editing the item
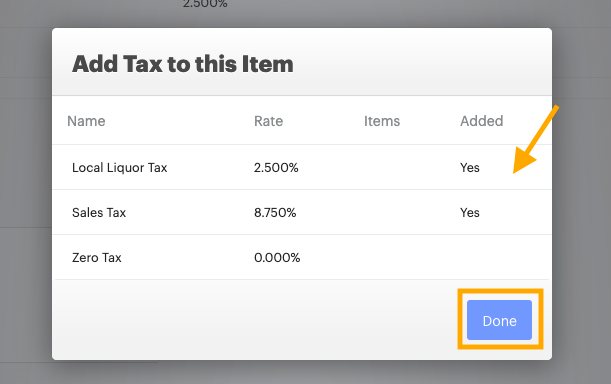
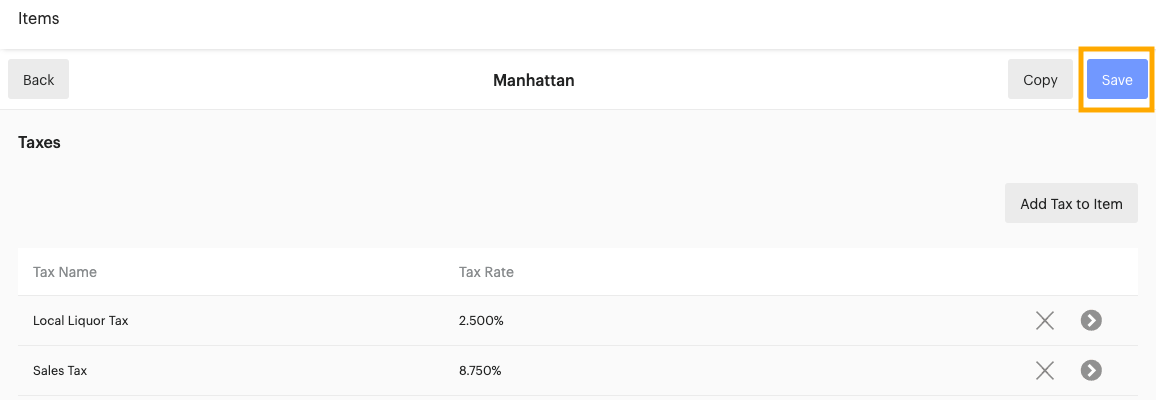
Using Multiple Tax Rates
In HQ, you can create multiple tax rates. Adding a multiple tax rate is no different than adding a single tax rate. Some restaurateurs may prefer to have all taxes rolled up into a single tax rate. However, with multiple tax rates, you can itemize the taxes on your receipts and reports. This is particularly helpful when your tax situation may not match a guest's expectations and is greater or less than expected.
- Add each tax rate to the HQ Settings > Tax section
- In HQ, click Menus > Items
- Click on the item you wish to edit
- Scroll down to Taxes
- Click Add Tax to Item
- Click each tax rate that should be assigned to the item
- When each required tax rate says 'Yes,' click Done
- Click Save
Tax Exclusive & Inclusive Tracking
Tax rates can be set as inclusive or exclusive from the
Categories section of
HQ. Before you assign tax inclusive/exclusive tax types to your
Menu Categories,
you will need to select your preferred 'Tax Inclusive/Exlusive Tracking.' This setting determines how tax will calculate on a check when tax inclusive and tax exclusive items are added to the same check.
What is Inclusive Tax vs. Exclusive Tax?
- Inclusive Tax: the price of an item includes tax (Sales Tax will say 'Inclusive' on the receipt since it is included in the item price)
- Exclusive Tax: tax is added on to the item price (Sales Tax will show tax total applied to item)

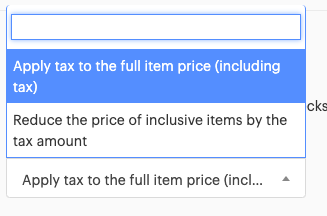
Inclusive/Exclusive Tracking Setting
- In HQ Settings > Taxes navigate to the Tax Inclusive/Exclusive Tracking section
- Click on the setting box
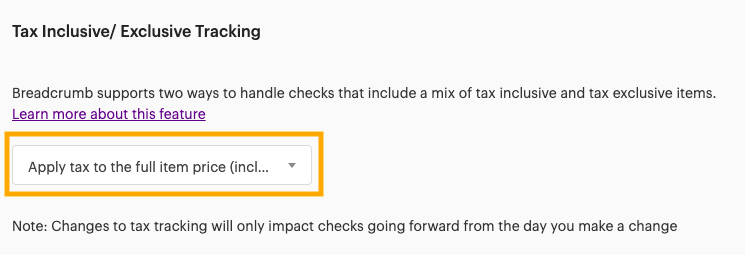
- Select one of these settings:
Apply Tax to the Full Item Price (Including Tax)
All items are assumed to be tax exclusive and tax will be charged based on the item price. So, if a $6.00 tax inclusive beer is on the bill along with one or more tax exclusive items, the tax rate will be applied to the $6.00 price of the beer.
Reduce the Price of Inclusive Items by the Tax Amount
The price of the tax inclusive item will be reduced by the amount of the tax and the tax will appear on the tax line of the check. So, if that $6.00 tax inclusive beer is on the bill along with a $10.00 tax exclusive burrito, the tax rate will be removed from the inclusive item's price and will appear on the tax line of the receipt.
Example Inclusive/Exclusive Tax Tracking on Checks with Inclusive/Exclusive Items

Assigning Tax Exclusive/Inclusive Tax Type to Categories
After you select you set you 'Tax Inclusive/Exclusive Tracking' setting, you will need to assign tax inclusive or exclusive tax types to each Category on your menu. All items assigned to a category will use the tax exclusive or inclusive category setting. You may choose to keep all of you categories tax exclusive. Or you may decide that you'd prefer certain categories to be inclusive.
| Example: You may want to set categories related to bar items, such as 'Draft Beer,' to tax inclusive, so that a beer item is $5.00 even, including tax. This encourages guests to pay with cash and allows for quick service. |
- In HQ, click Menus > Categories
- Click on the category you wish to edit
- In the Tax Type section select your preferred tax inclusive/exclusive setting
- Click Save
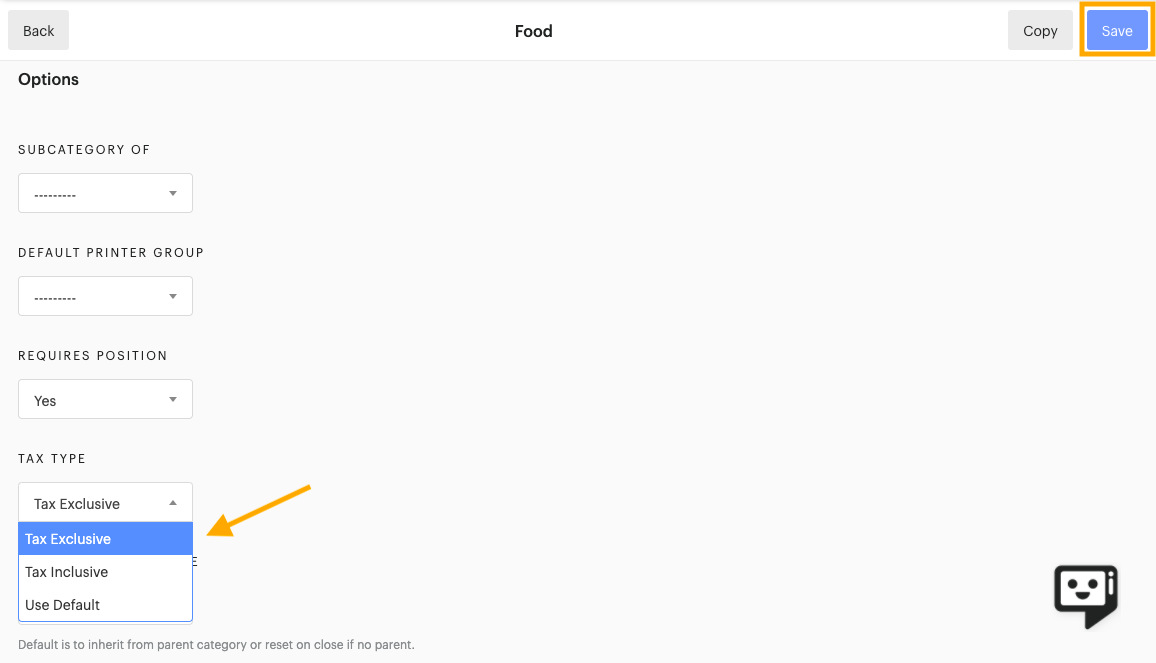
| Note: If you select 'Default' the category will use the 'Default Category Tax Type' selected in your HQ Point of Sale (General) Settings. To learn more about General Settings, click here. |
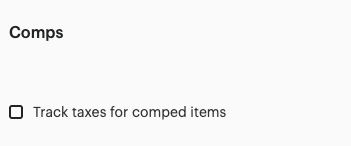
Tracking Taxes on Comps
If you need to track taxes on comps for your state, you can check the 'Track taxes for comped items' setting in the HQ Settings > Tax section.
| Important: Consult with an accountant or another tax specialist to confirm if your municipality requires taxes on comps to be tracked, so that comps and comp reasons are tracked correctly in the Upserve POS. Use of Upserve's sales tax figures does not constitute expert guidance as stated in our Terms of Service. |
Track Taxes on Comps is Turned On
If this setting is checked then the total taxes on comps will be added to your 'Total Tax' and 'Gross Sales' totals in the Sales Report.

Track Taxes on Comps is Turned Off
If this setting is unchecked, the total taxes on comps will show an amount of $0.00 and will not be added to your 'Total Tax' & 'Gross Sales' total in the Sales Report.

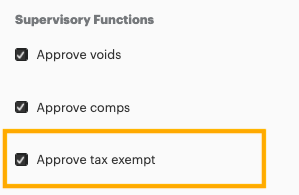
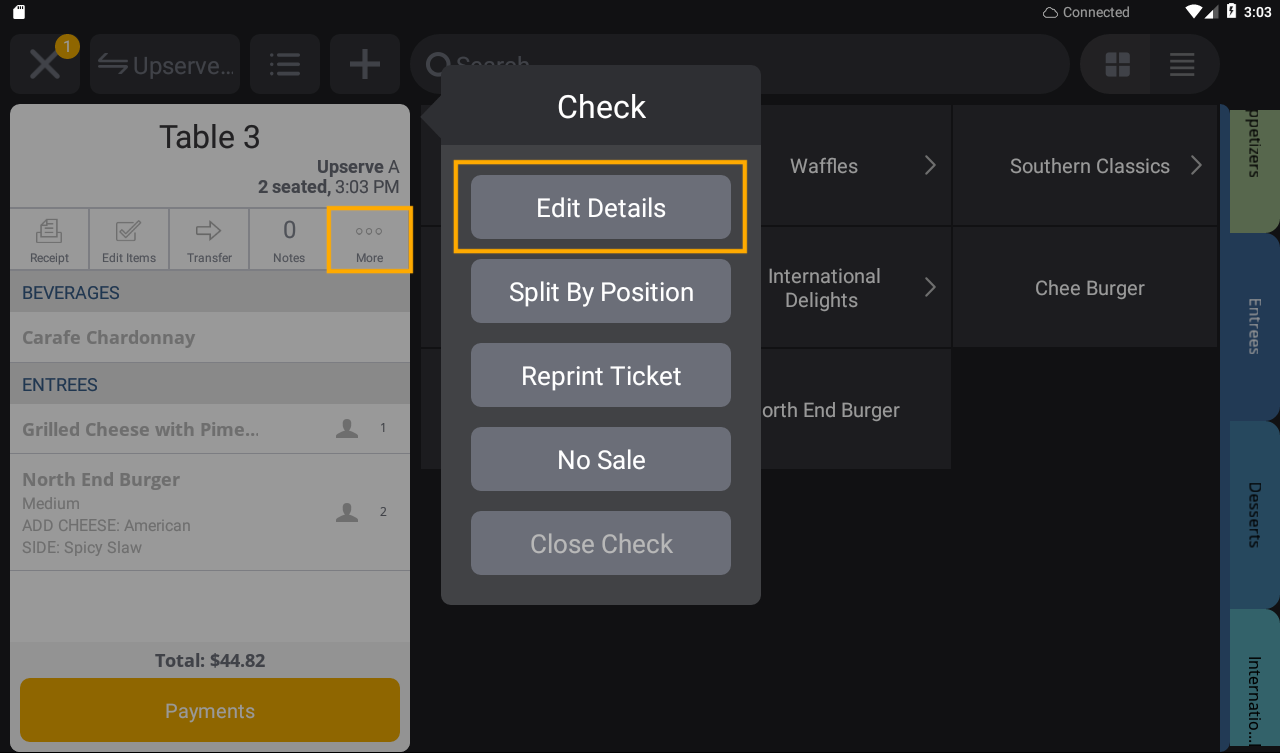
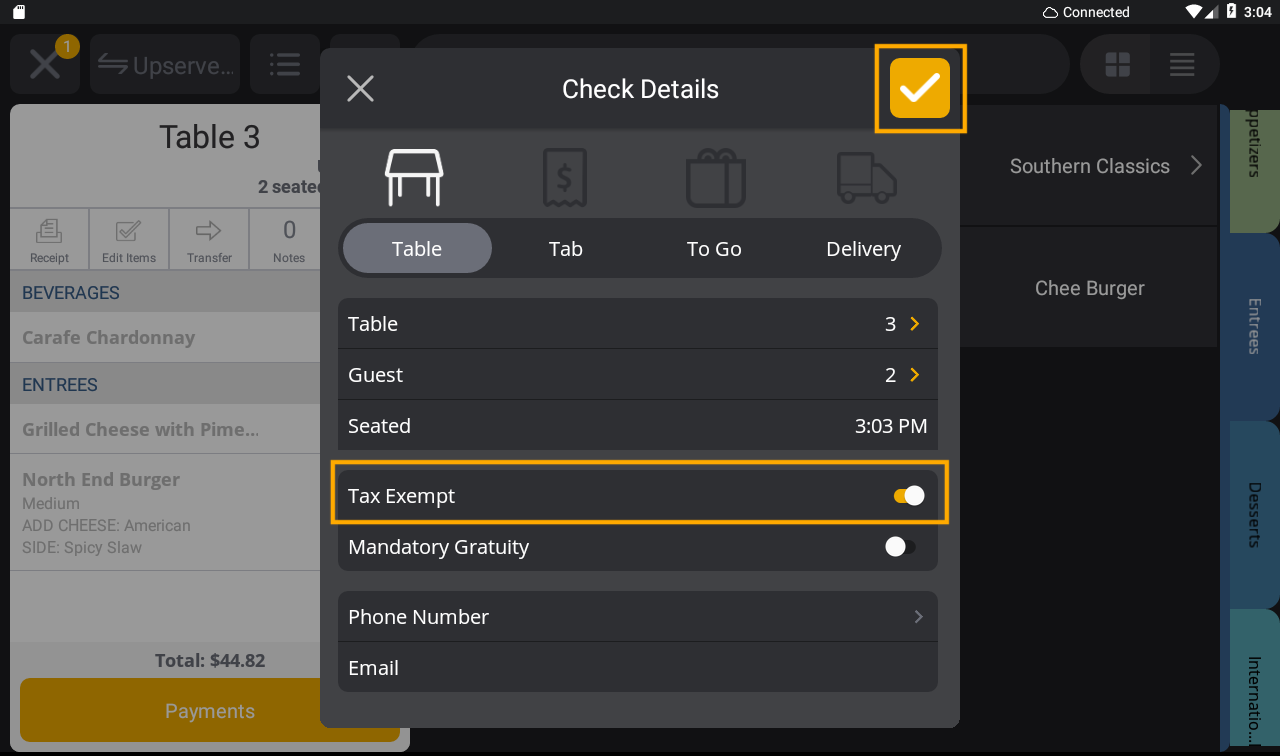
Tax Exempt Checks
If you have the HQ Role permission to 'approve tax exempt,' you can apply a tax exemption to a check if a guest presents a tax exemption card.
To learn how to edit an Upserve POS role, click here.
Apply Tax Exempt to a Check
- On the check you wish to edit, tap More
- Tap Edit Details
- Toggle on 'Tax Exempt'
- Tap the orange check mark to Save
- Tap payments to view the check balance (the tax will say 'Exempt' and be zero)
| Note: If you do not have the 'approve tax exempt' permission for your role, a 'Manager Approval Required' popup will appear if you attempt to turn on 'Tax Exempt' for a check. An Admin/Manager with the 'approve tax exempt' permission will need to enter their 4-digit Upserve POS pin code to approve the tax exempt. |
Tax Calculation on the Upserve POS
Total sales tax charged in Upserve POS is calculated based upon a check's subtotal amount for each check. We calculate tax by a check's subtotal because this reflects the values charged directly to customers for tax.
Total Sales Tax Collected May Not Match the Exact (Net Sales x Tax Rate) because...
-
Any rounding that occurs on each check due to tax rates with decimal values (Ex: 8.875%) will result in fractional pennies that need to be rounded in order to charge customers the correct amount
-
Some item(s) sold may have been sold tax exempt for eligible customers
| Note: Use of Upserve POS sales tax figures do not constitute expert guidance. |
Tax Reporting
Your Upserve POS Sales Report (Dashboard) will show total taxes collected and will report based on your tax settings. If you create multiple tax rates, each tax rate will appear in this report.
You can also view a breakdown of all taxes collected in your Payments Report and Accounting Export. To learn more about Upserve POS reports, click here.


