Upserve POS integrates with QuickBooks Desktop and QuickBooks Online. For QuickBooks Desktop, review this article to learn how to download the Upserve POS Accounting Export and import it into Quickbooks. For Quickbooks Online, review this article to learn how to automatically import Upserve POS reporting data into Quickbooks using Shogo.
QuickBooks Desktop
QuickBooks Online & Shogo
QuickBooks Desktop
Download the Accounting Export
- Log in to HQ
- Select Finance > Accounting Export (Note: If you're using Breadcrumb HQ, click Reports > Accounting Export)
- Click the Date Bar to select your preferred date or date range
| Note: The maximum date range for the Accounting Export is 1 Month (or 31 Days). You will be able to preview a report for each day within the date range and each day uploads to QuickBooks as a distinct journal entry. |
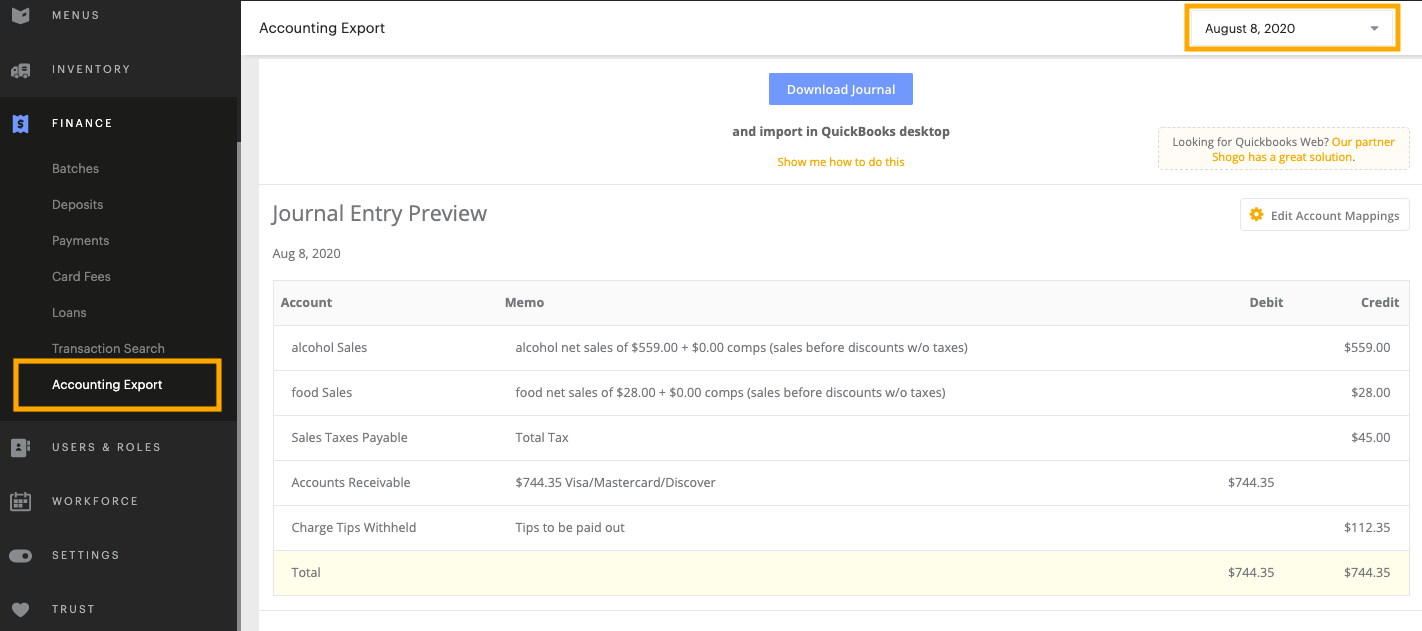
- Edit Account Mapping (if needed)
Your sales data is mapped to the accounts established by the National Restaurant Association's Uniform System of Accounts for Restaurants. Verify they match your QuickBooks Account Settings prior to downloading/importing the file. Click here for account mapping instructions.
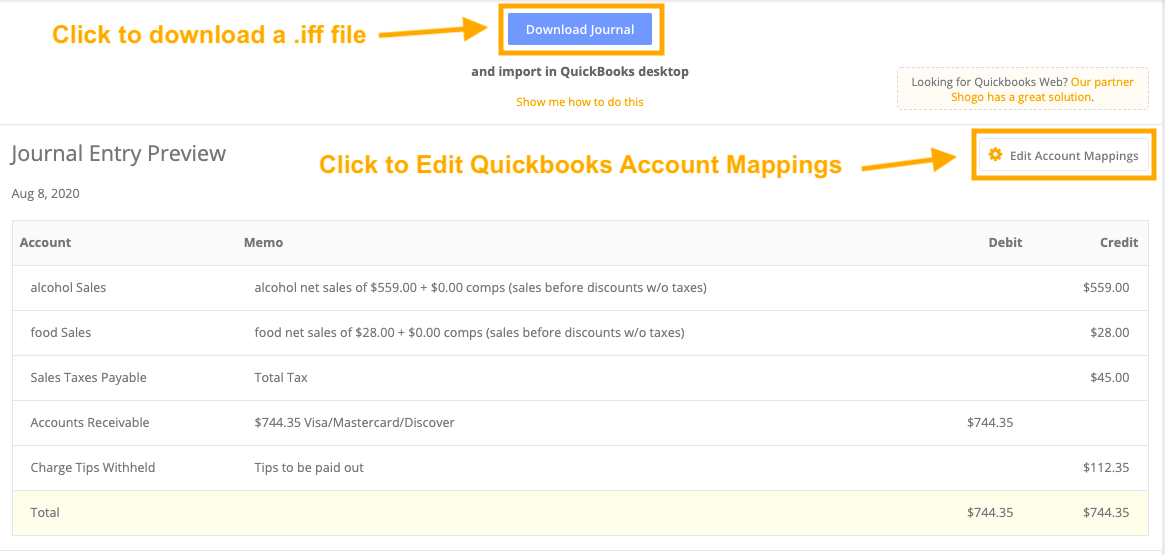
- Click Download Journal to download the report as a Intuit Interchange Format (IIF) file.
Accounting Export Unbalanced Journal Entry Error
When you open the Accounting Export page and select a custom date(s) for the report, you may encounter an error that says 'The date range has unbalanced journal entry due to checks left open.'

If you see this error appear, check your Upserve POS for checks that are left open from the selected date(s). Open checks from previous trading days will be highlighted in red on the Upserve POS.
- Go to an Upserve POS terminal
- Close the open checks on the Upserve POS
- Then return to HQ and refresh the Accounting Export page
| Note: If your Accounting Export still shows an 'unbalanced journal entry' error after all checks are closed, contact Support Team to assist you. |
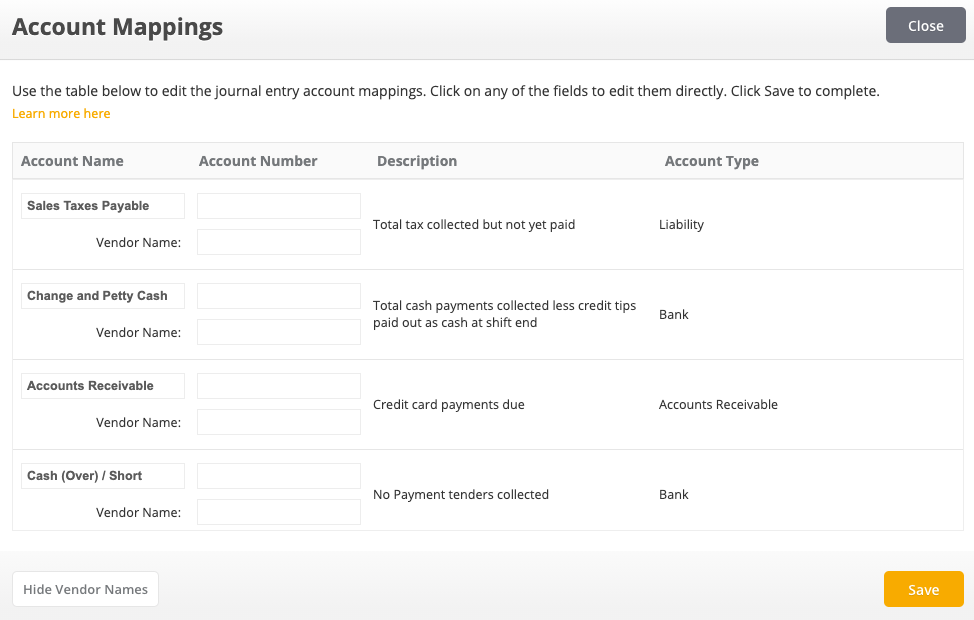
Edit Account Mappings
If your business account settings in QuickBooks don't match the presets we created in Upserve POS, follow these steps to map them before you import any files into QuickBooks.
- On the Accounting Export report, click Edit Account Mappings
- A master list of all possible accounts generated through your Upserve POS sales will appear
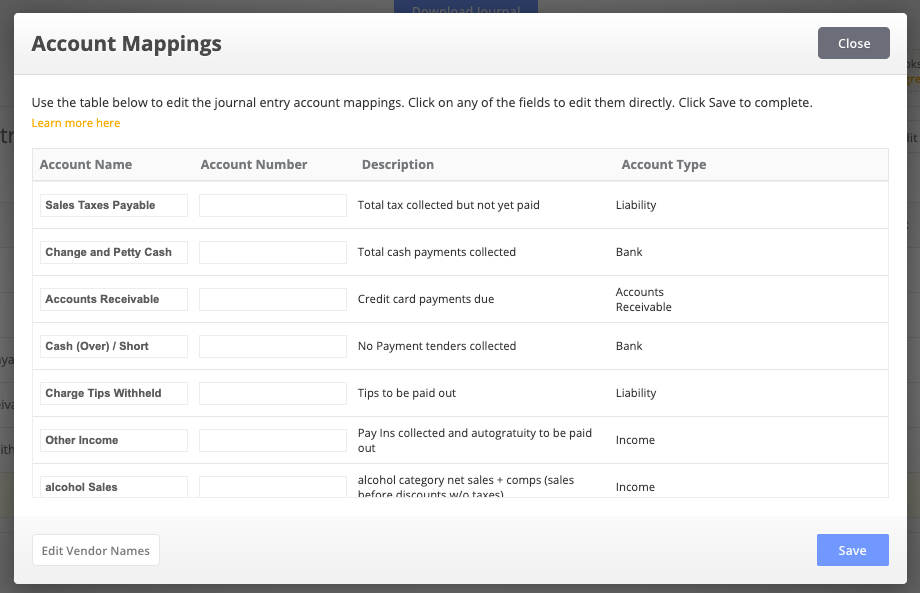
- Click on the Account Name and/or Account Number fields to enter the correct account name and/or account number for QuickBooks (Note: If an account number is set, the account name will not be able to be used in the export).
- Any edited field will be highlighted
- Click Save

After you save, your journal entry preview and exports
will have the new fields specified. We will never attempt to create or update any account that you edited on the Account Mappings page.
Account Mapping Errors
Make sure that account names/numbers are
entered correct before you the save the mappings
If your file import to
QuickBooks returns an error that says "
You must specify a vendor name for the [Account Name] account,' folllow these steps:
- Return to the Account Mappings screen in HQ
- Click the Edit Vendor Names button at the bottom of the Account Mappings screen
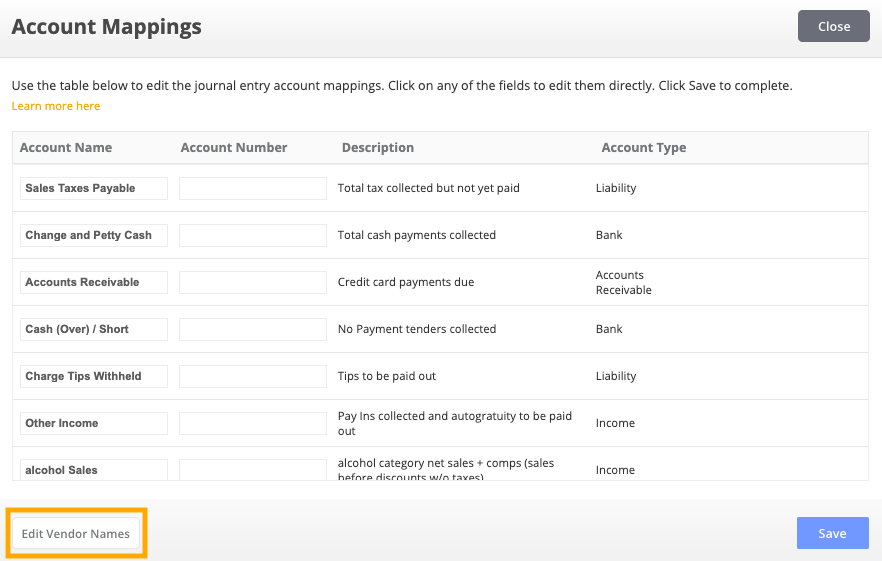
- Enter the vendor name(s) for the required Account
- Click Save
- Download the report and import the new file
Import the Accounting Export File into QuickBooks
After you
download the Account Export IIF File, follow Intuit's instructions for importing IIF files into your QuickBooks Desktop:
QuickBooks 2019 & Later - Import Instructions
- Go to the File menu, select Utilities then Import then IIF Files
- Select Import IIF
- Locate the file, then select OK
Note: Intuit does not recommend the option "Import it for me. I'll fix it later," since this option bypasses data review, some of the info may not be correct or complete for your books. It also requires that you switch to a single user.
- Once the import is successful, you'll see the numbers of lists and transactions imported
- Click Done
| Note: For the full set of instructions and more tips on how to manage IIF files in QuickBooks Desktop 2019, click here. |
QuickBooks Desktop (Older Version) - Import Instructions
- Sign in to your company file as an admin
- Go to File and select Switch to Single-user Mode
- Make a backup of your company file. This way you can restore it if the data doesn't import the way you expected.
- Go to the File menu and select Utilities then Import. Select Import IIF Files
- Locate and select your IIF file, then click Open
- Select OK to confirm your data was imported
| Note: For the full set of instructions and more tips on how to manage IIF files in QuickBooks Desktop, click here. |
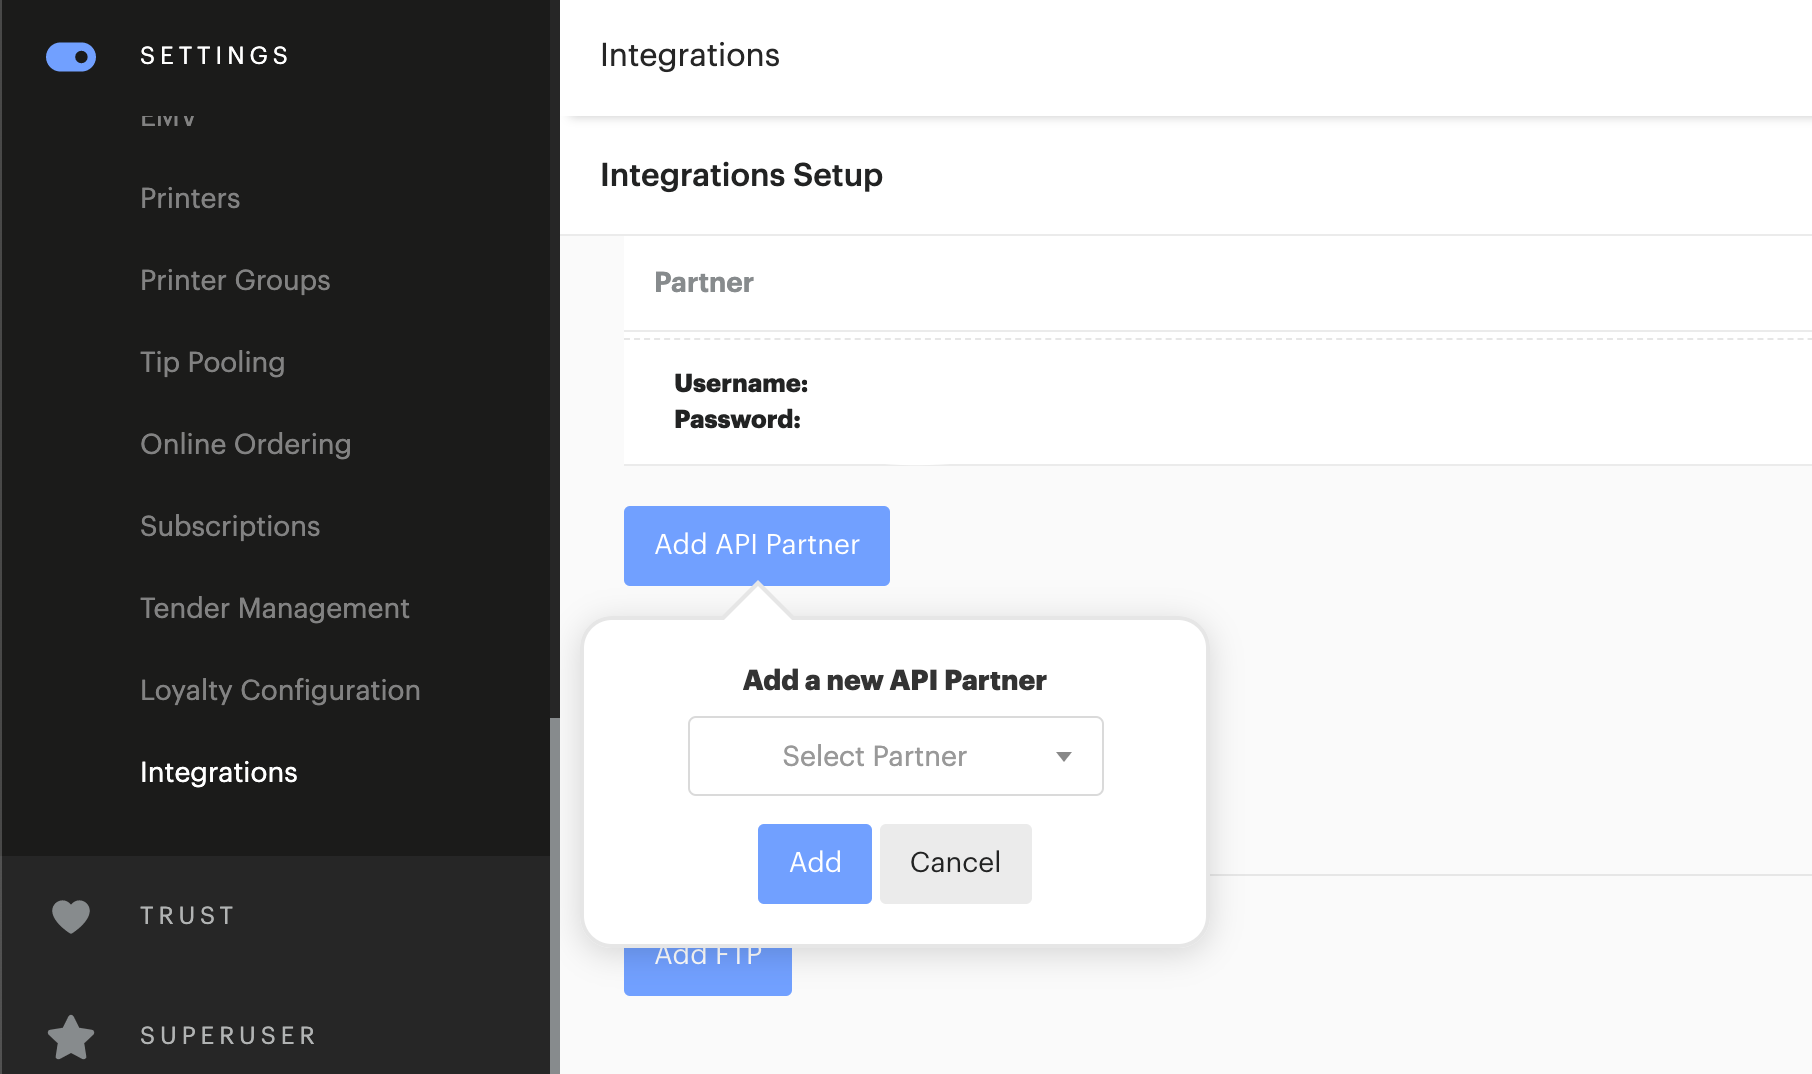
QuickBooks Online & Shogo
Many businesses use QuickBooks Online to manage their accounting processes. Upserve POS integrates with QuickBooks Online via our accounting partner, Shogo.
Shogo will be able to set up your account to automatically pull all of your sales information into Quickbooks Online every day, via Upserve's API.
To learn how to set up an API connection with Shogo or another integration partner, click here.
To visit Shogo's website, click here.
| Tip: Want to learn more about Accounting Software solutions? Click here to visit our blog. |

