Looking for a digital solution to your kitchen printing? The Epson Kitchen Display System (KDS) can replace your kitchens printers and display kitchen chits on one or multiple monitors at your prep stations. The KDS can also be set up to work with your regular kitchen printers, so you can have a digital display of chits and printed copies available for your kitchen staff! Our Team will will help you set up your Epson KDS hardware and will help you configure the display and item/category routing for the needs of your restaurant.
In this article, your learn how to use the Epson KDS, how item and category routing works on the KDS, and what to do if you want to make changes display changes on the KDS after it is installed. Use the quick link below to jump to any section:
Using the Epson KDS (with Bump Bar)
Epson Touch Screen KDS
Item/Category Routing on the KDS
Changing Chit Display, Fonts and Colors (By Appointment)
Using the Epson KDS (with Bump Bar)
| Want to add the Epson KDS to you restaurant? Visit our KDS page on the Upserve Store to view our KDS hardware options and pricing. Contact your Account Manager to order your KDS hardware and add KDS to your Upserve POS subscription. |
KDS Display
When our Team installs the Epson KDS for you, we will help you select your preferred font, colors and the number of chits you'd like to view on the screen.
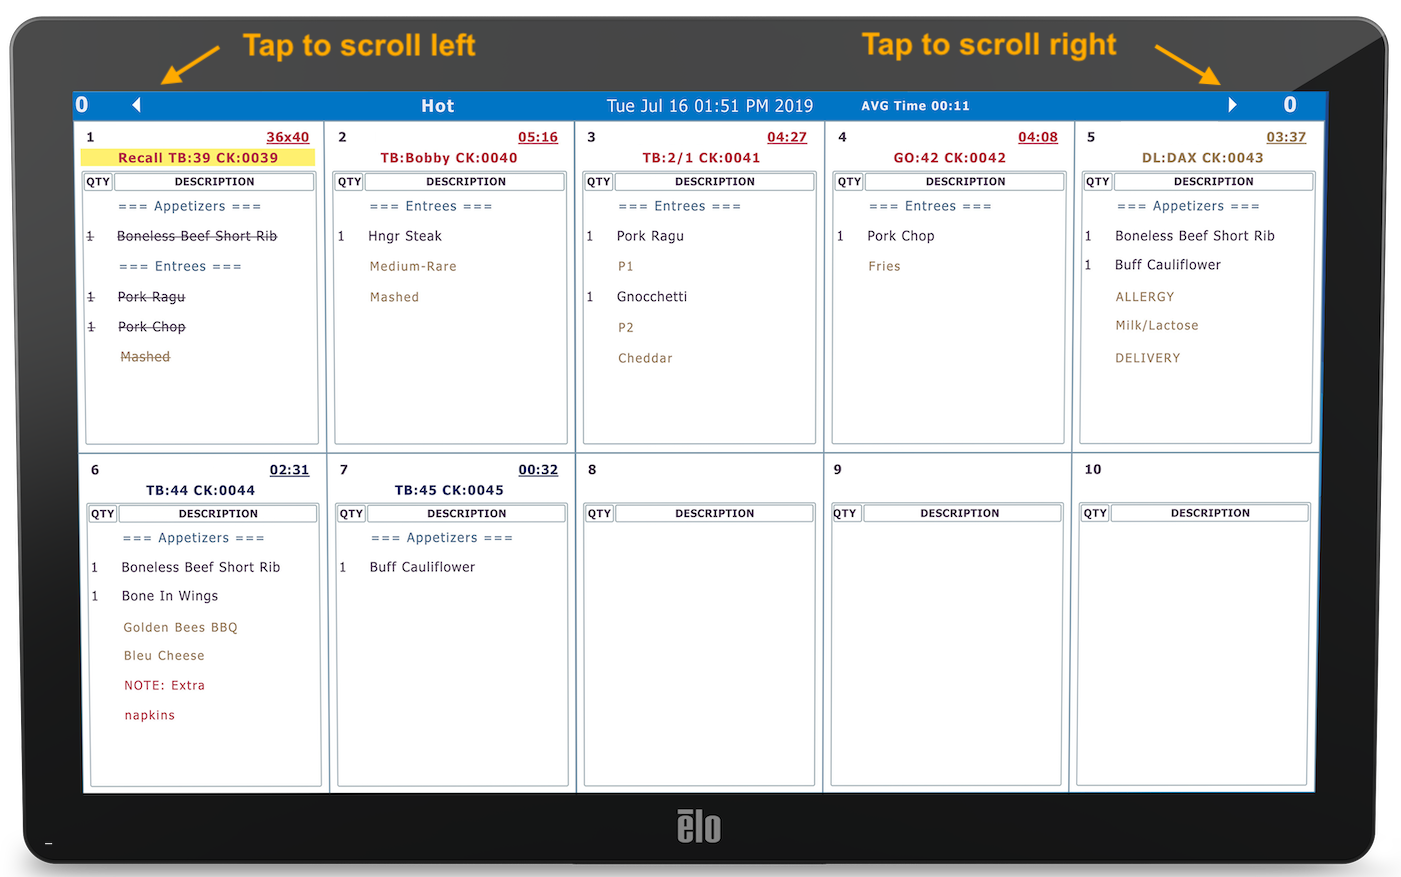
The Epson KDS screen offers a clear view of up to 12 active chit orders. If more than 12 chit orders are active, you can scroll from left to right on the screen to view more chits. During your KDS installation, you can choose for the screen to display a minimum of 4 chits or a maximum of 12 chits.
To view our available KDS monitors, click here.
Display Features
When an order is sent from the Upserve POS, the chit will appear on the Epson KDS screen. Menu items and categories can be routed to appear on different KDS station monitors if you use multiple screens.

On the Epson KDS screen you will see the following features:
- Name of the KDS Display (station name)
- Average order preparation time
- Page number (Active chits can span multiple pages)
- Chit Info: Server Name, Check Type (Table, Tab, Delivery, To-Go), Check Number & Time Elapsed Since 'Sent'
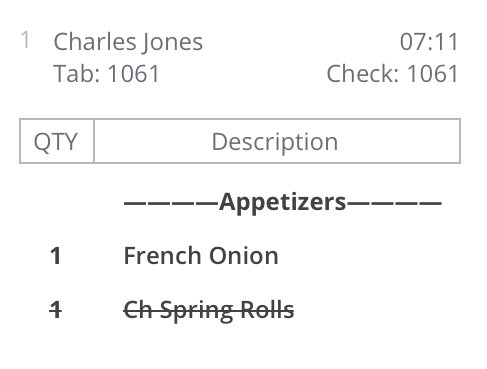
- Chit Item List: Courses, Item Name, Quantities, Modifiers, Sides (Strike-through indicates item was prepared or bumped)
- Items Added After Order Is Placed Are Highlighted (Helps alert the kitchen that the order changed)
- Seating Positions Appear Under Item (if position is required)
Single Screen vs. Multi-Screen KDS
When you sign up to use Epson KDS, you can choose to purchase a single screen and multi-screen setup.
For a KDS single screen setup, you will need a KDS Monitor, Epson U220i, Bump Bar (or KDS touchscreen), power cables and Ethernet cables. You can also purchase a monitor wall mount if you would like to mount the monitor on a wall.
When an order is sent from the U-Series POS, the chit items/categories are routed to the KDS through the Epson U220i and tells the Epson KDS monitor what to display. To view our available Epson KDS Station Kits, click here.

A multi-screen KDS setup require an expansion module (controller) for each monitor. The Epson U220i communicates chit item/category routing through each expansion module, so that items/categories are routed to the correct KDS monitors and kitchen stations. Multi-screen KDS monitors can be set up to display only items/categories related to that stations prep work (Ex: A 'Cold Station' could have a KDS that only displays cold item appetizers, salads and cheese plates that need to be prepped)

Most restaurants that use multi-screen KDS, use five or less screens, since screens require kitchen space and staff members to manage the screens. We can support up to seven KDS screens, though, if you have a large kitchen layout and staff.
| Note: Epson KDS are wired devices, meaning that they must be connected to a power source and to you router (or a switch) via Ethernet cable. When the KDS is installed, will need to be able to run Ethernet cables from your KDS kitchen stations to you router. |
Expo Station
Epson KDS has optional expediter (expo) functions that allow for one screen to be designated as an Expo Station. A copy of all items from every order is displayed on the Expo screen. Once an item is bumped (marked as complete) from its original station it will be struck through on the Expo screen. When all items have been bumped (marked as complete) the order will be highlighted on the Expo screen. When all items have been bumped (or marked as complete) on an order, the entire order can be bumped from the Expo Screen.
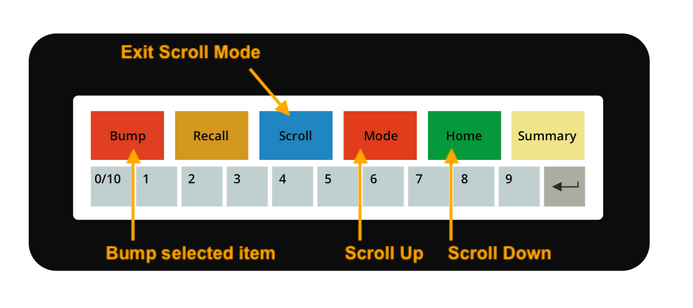
How to Use the Bump Bar
The bump bar allows you to bump (mark complete) items or entire chits, and recall bumped chits (return completed chits to the screen)

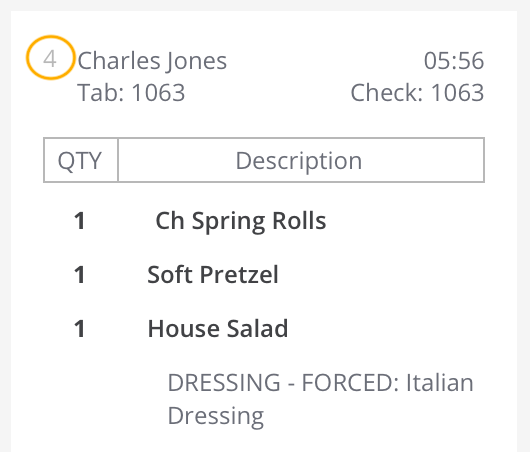
When you bump (mark complete) items and chits, you will need to identify the chit's tile number in order to navigate to the correct chit you wish to bump. The tile number will be located at the top left of the chit.
Example: Check 1063 is 'Tile 4'
Bump an Entire Chit
Press the tile number (1-9) for the chit you wish to bump or mark as complete. The chit will be bumped and removed from the screen.

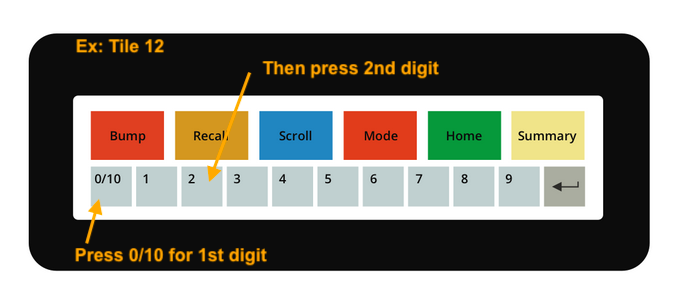
To bump tiles 10-12, you will need to press the 0/10 key (acting as the first digit) and then press the second digit.
Example: To select Tile 12, press 0/10 and then press 2.
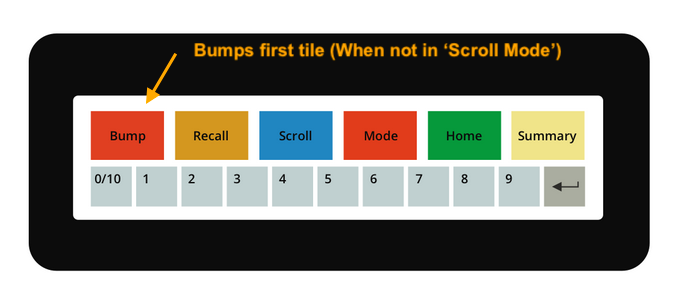
If you just need to bump the first order on the screen, you can simply press Bump (make sure you are not in scroll mode or you might accidentally bump a selected item on a chit).
Bump an Item in Scroll Mode
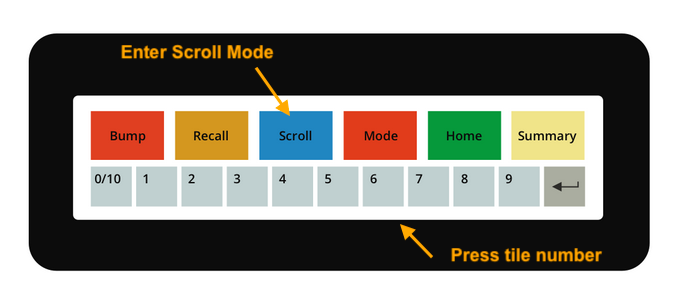
Press Scroll to enter scroll mode and then select the tile number (1-9) for the chit you wish to edit. To bump and item on tiles 10-12, you will need to press the 0/10 key (acting as the first digit) and then press the second digit. (Ex: To select items on Chit/Tile 12, press 0/10 and then press 2)
After you enter scroll mode, the first Item in the chit will be selected. Press Home to scroll down and select the next item in the order (or to continue scrolling down through other items). Press Mode to go scroll up to previous items.
When you're ready to bump an item, make sure the item is selected and press Bump. The item and its modifiers/notes will be struck-through and marked as complete.
When you're ready to stop scrolling through items, press Scroll to exit Scroll Mode.
| Need to Un-Bump an Item or Chit? If you accidentally bump an item, enter scroll mode to select the item on the chit, then press Bump. If you accidentally bumped an entire chit, you can recall the chit and return it to the active chit screen. |
Recall a Bumped Chit
If you need to return a bumped chit to the display screen, press Recall. A list of bumped (or completed) chits from the day will appear on screen. Press Home to scroll down the list of chits. Press Mode to scroll up the list of chits. When you have highlighted the chit you wish to recall, press the enter (arrow) key to return it to the display screen.

Summary Button
The Summary Button is built into the Epson KDS functionality, so that item recipes and descriptions can be displayed. Although the U-Series POS integrates with Epson KDS, the KDS currently cannot display U-Series POS item recipes or descriptions. If you would like to see this feature added to the KDS integration in the future, contact our Support Team to submit a feature request for our Product Team to review!
Epson Touch Screen KDS
The Epson KDS Touch Screen replaces the functionality of a bump bar, allowing kitchen staff to bump items/chits and recall chits with a few simple taps on the touch screen.
Bump Items and Chits
Recall Chits
Scroll to the Next Page
Calibrating the Touchscreen KDS

Note: The touch screen has the same sensitivity as smartphones and touch screen tablets. The touch screen will not respond to touch if your hands are wet or if you are wearing thick gloves for kitchen prep work.
A bump bar cannot be plugged into the Touch Screen KDS and used to manage chits with the touch screen functionality. If would like to you use a bump bar and disable the touch screen functionality on your Touch Screen KDS, you can make an appointment with our Support Team KDS Specialists to re-configure your KDS settings. |
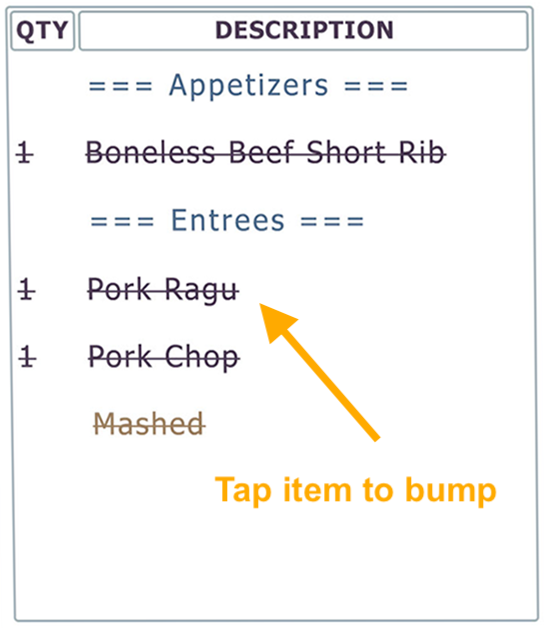
Bump Items and Chits
To bump or mark an item complete, tap on the item. The item and its modifiers/notes will be struck-through and marked as complete.
To bump or mark an entire chit as complete, tap on the chit header or tap on each item on the chit. The chit will disappear from the active chit screen.

| Need to Un-Bump an Item or Chit? If you accidentally bump an item, tap the item again to remove the strikethrough. If you accidentally bumped an entire chit, you can recall the chit and return it to the active chit screen (see instructions below). |
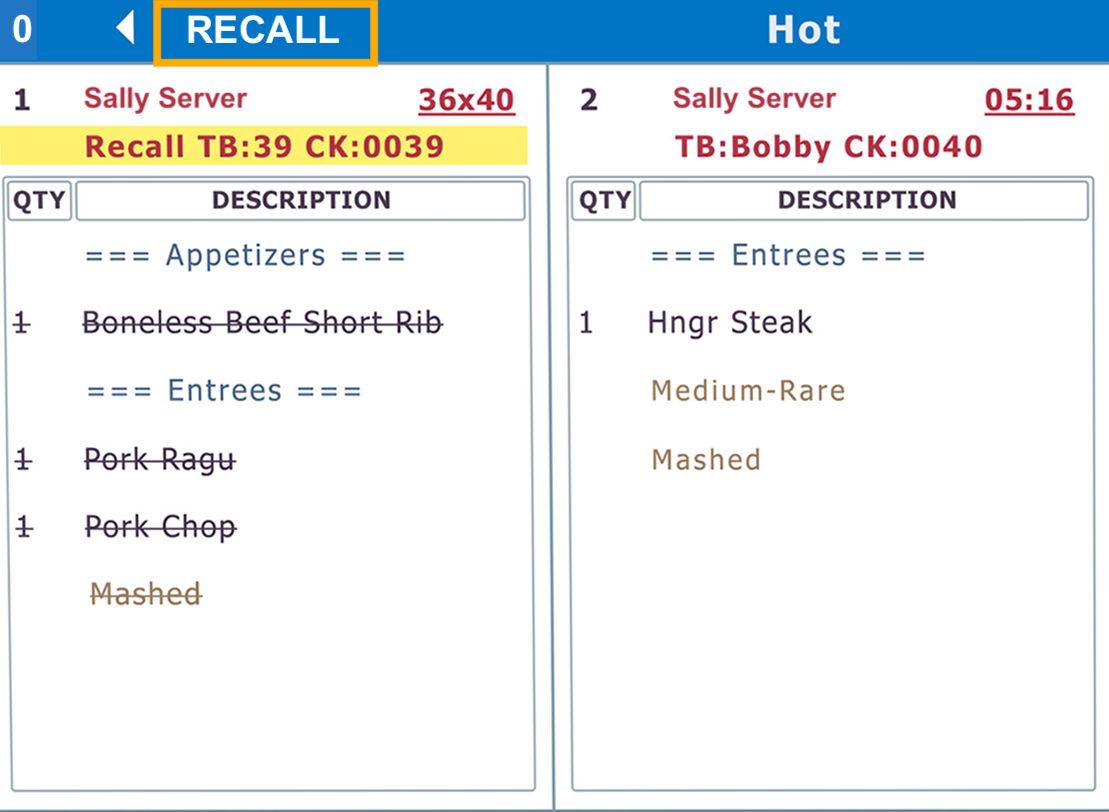
Recall Chits
- Tap the Recall button at the top left of the screen
- A list of completed chits will appear
- Tap on the chit you wish to recall
- The chit will return to KDS screen and will have a 'recalled' banner at the top
- Tap on each item on the chit to remove the strikethrough (optional)
Scroll to the Next Page
If you have more active chits than can fit on the screen, you will have multiple pages of chits to manage and scroll through. Tap the arrows at the top of the screen to scroll through each page of active chits.
Calibrating the Touchscreen KDS
For accurate operation, the Touchscreen should be calibrated prior to use.
To calibrate the screen, have the customer push and hold a spot on the screen for 10-30 seconds to trigger the calibration.
A sequence of 5 screens will appear to set the calibration. Each screen requires a point on the screen to be pressed in a certain location.
Item/Category Routing on the KDS
The U-Series POS routes items and categories to each KDS screen based on the item/category print settings.
During your KDS installation, each KDS is added to the HQ Printers page. Then the KDS 'printer' is added to a printer group on the HQ Printer Groups page. If an item or category of items is not routing to the correct KDS screen, check that the KDS's printer group is the assigned printer group for the item/category (see example below).
| Note: If you have a multi-screen KDS setup and are using an Expo KDS to view all active chits, the Expo KDS will not appear in your HQ Printer list. The Expo KDS does not need to be added to HQ Printers during installation because it is configured to automatically display all active chits. |
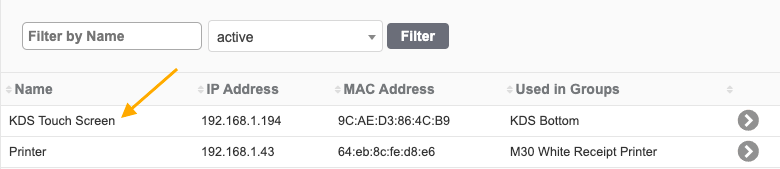
'KDS Touch Screen' is added as a 'printer' to the HQ Settings > Printers page.
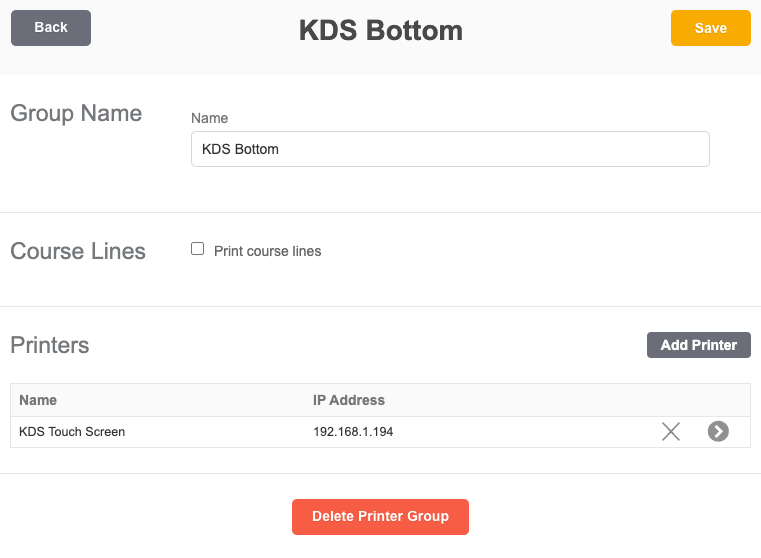
'KDS Touch Screen' printer is added to the 'KDS Bottom' printer group in HQ Settings > Printer Groups.
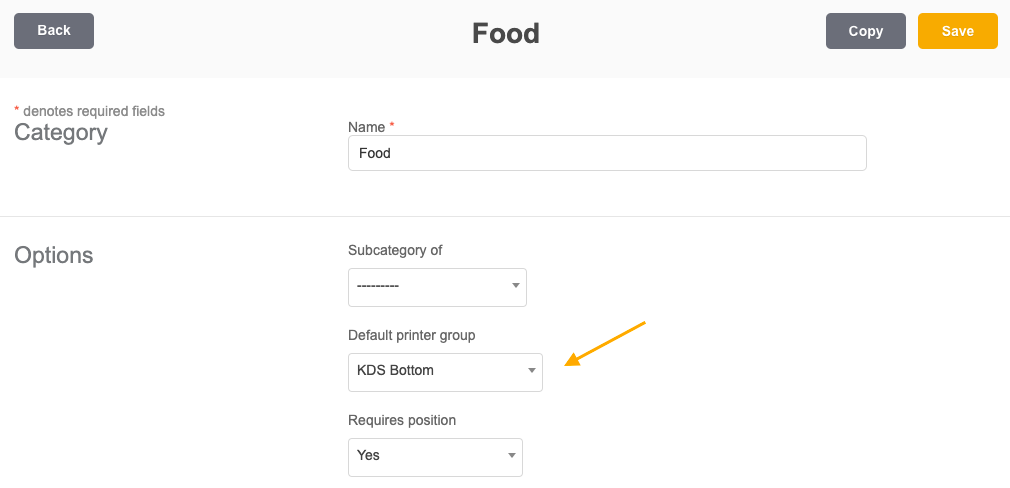
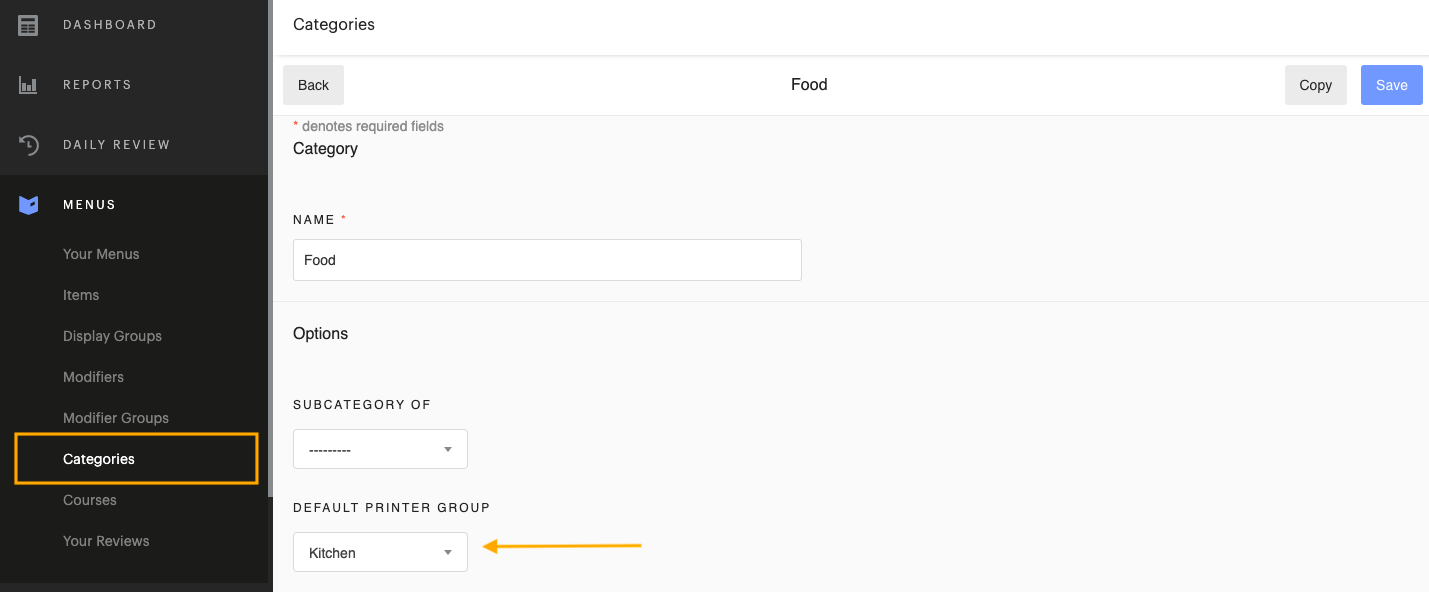
'KDS Bottom' is the assigned 'Default printer group' for the Food Category. All items assigned to the food category will route to 'KDS Bottom' (printer group) and display on 'KDS Touch Screen' (printer).
Printer/KDS Routing by Category
When you create or edit menu categories, you can assign a 'Default Printer Group' for the category. All menu items assigned to the category will route to the category printer group and print/display on the group's assigned printer/KDS, unless the item has an item-level printer group selected.
| Example: If the 'Pasta' category is set to print to the 'Kitchen' printer group, all items in the 'Pasta' category will display on the KDS added to the 'Kitchen' printer group. |
Categories for items that do not require preparation may not require a default printer group, depending on if you want a chit to print/display on the KDS when these items are sent from a check (Ex: Gift Cards, Fees, or Merchandise).
To assign a printer group to a category, follow these steps:
- In HQ, click Menus > Categories
- Click on the category you wish to edit
- Scroll down to Default Printer Group
- Select the preferred printer group for that category
- Click Save
| Note: You do not need to select a printer group for a sub-category, if you want the sub-category to use the parent category printer settings. |
To learn more about creating and managing categories, click here.
Printer/KDS Routing by Item
All menu items are assigned to a category. Items by default will print to the category printer group. If an item needs to print to a different printer group than the category printer group, assign a printer group to the item. Printer groups assigned at the item-level will override the category printer group setting.
| Example: The "Cheese Plate" item is assigned to the "Dessert" category for reporting purposes. The "Dessert" category routes to the "Pastry" printer group. The "Cheese Plate" needs to print/display to the "Cold Station" printer group. The "Cheese Plate" is assigned to the "Cold Station" printer group at the item level and displays on the 'Cold Station' KDS. |
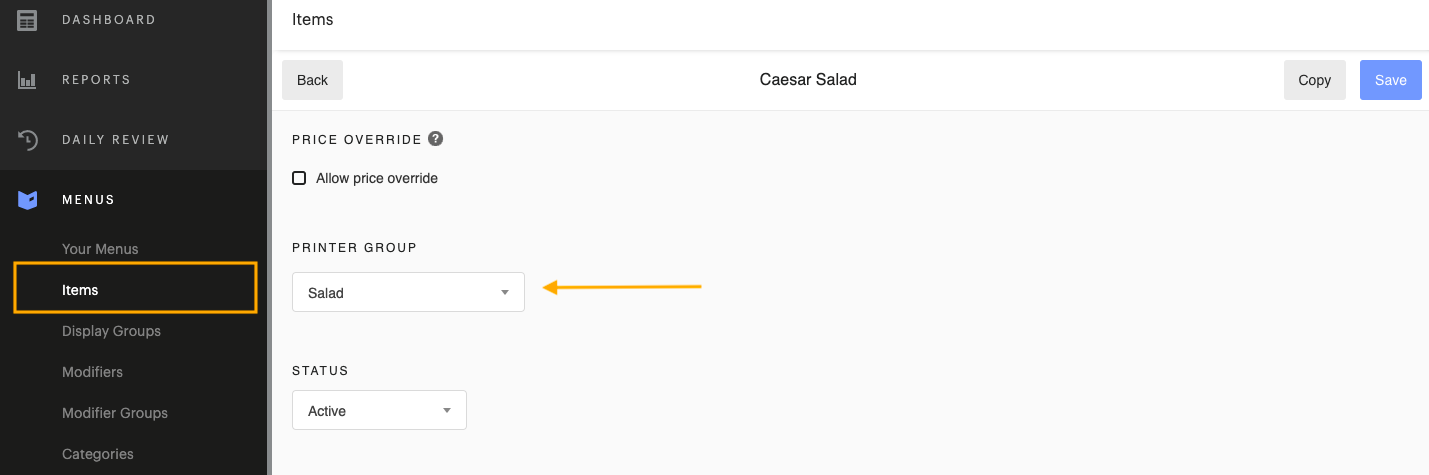
To assign a printer group to an item, follow these steps:
- In HQ, click Menus > Items
- Click on the item you wish to edit
- Scroll down to Printer Group
- Select the preferred printer group for that item
- Click Save
To learn more about adding and editing items, click here.
Changing Chit Display, Fonts and Colors (By Appointment)
After our team sets up your Epson KDS, you may decide that you want more or less chits to display on screen or you may wish to change the fonts/color of the chits. If you need to make changes on your Epson KDS, you will need to contact our Upserve Support Team and schedule an appointment with our KDS specialists.
At your appointment time, a KDS specialist will call your preferred contact number and will connect remotely to your KDS backend system through a Windows desktop or laptop computer. Changes cannot be made, unless there is a Windows computer available to connect to at the restaurant.
Changes that we can make for your KDS include:
- Change the number of chits displayed on screen (4-12 chits only)
- Change chit font and colors
- Set chit header text colors to change after designated periods of time (Ex: A new chit has blue header text, a chit that has been on the KDS for 4 minutes has brown header text, a chit that has been on the KDS for 10 minutes has red header text)
- Turn on/off Kitchen Printing with the KDS (print a paper chit copy of all KDS chits)

