Roles are the defined permissions that restaurateurs create to control the level of access their employees have in the POS. This article will show you how to create Upserve POS roles and provide examples of common roles within a restaurant.
Restaurant Roles & Permissions
How to Create an Upserve POS Role
Restaurant Roles & Permissions
Common Roles
In HQ, you can create any role you need for the needs of your business. An Admin Role will automatically be created for you during onboarding.
Here are some common restaurant roles that you can create:
Admin: This user can access all areas of Upserve POS, formerly known as Breadcrumb, and Upserve HQ. It is usually the owner of the venue.
General Manager: This user can access areas of Upserve POS and Upserve HQ that are necessary for the day to day management of a venue, such as managing users, sending notes, closing the trading day and accessing reports.
Bartender: This user can access areas of Upserve POS and Upserve HQ that that are necessary for management of the bar where cash is handled. In some cases, this user will act as a cashier and be able to close the trading day.
Server (who can receive cash): This user can access areas of Upserve POS that allow the holding of cash payments. This user can open checks, process payments, and close checks throughout a shift.
Server (who cannot receive cash): This user can access areas of Upserve POS that allow the creation and management of checks. This user cannot receive cash payments but can process credit card payments.
You will also need to create a Role for any users that will need to clock in and clock out on the Upserve POS, but may not need to create checks or process payments (Ex: Porter, Host, Barback).
How to Create an Upserve POS Role
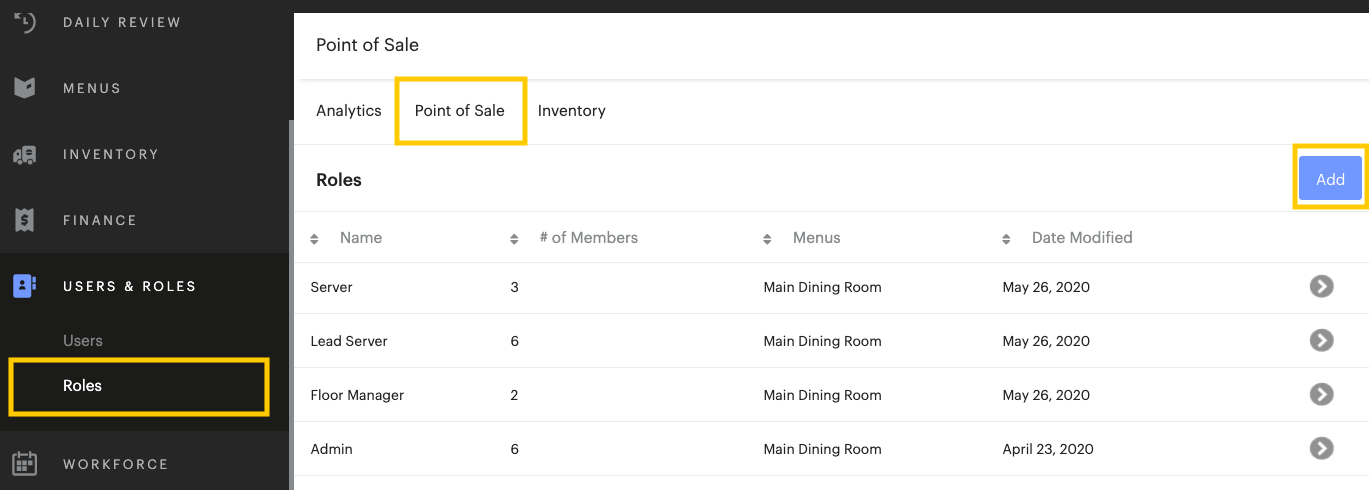
- Login to HQ
- Click Users & Roles > Roles
- Click Point of Sale
- Click Add
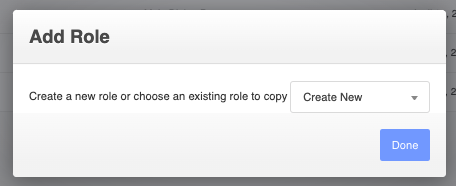
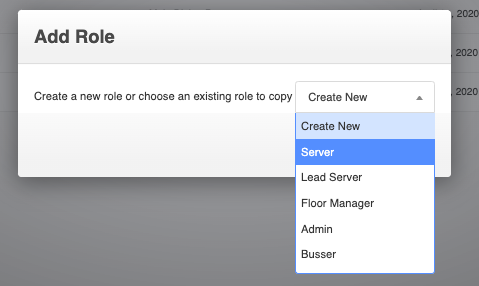
- Select Create New > Done to create a new role or click Create New and select an existing role to copy, then click Done
- In the Name section, enter the name of the role.
- In the Home Screen section, select the default home screen for the role. This will be the first screen a user sees upon entering a PIN code.
Home/Table: The Admin home screen appears first. This option is recommended for admins and managers.
View/Check: The Checks filter screen appears first. This option is recommended for hostesses placing predominantly To-Go and Delivery orders.
List/Quick Serve: The QuickServe screen appears first. This is recommended for bartenders, baristas and food truck users.
View/Table: The Table Map appears first. This is recommended for servers and hostesses in a sit-down venues.
- In the Menus section, select the menu to display for this role
- In the General Permissions section, check or uncheck permissions to customize what users in that role should or should not be able to do in HQ and on the Upserve POS.
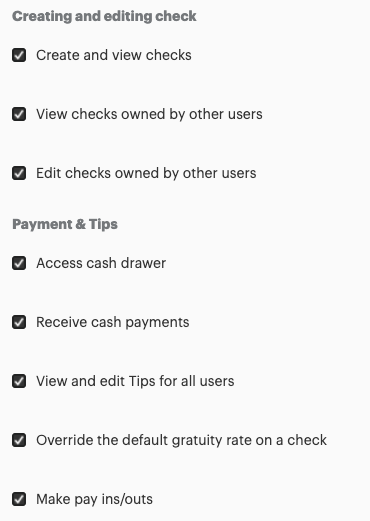
Creating and Editing Checks: select or de-select the check permissions users in this role should have. Select 'Create and view checks' if users in this role should only create and view their own checks.
Payment & Tips: select or de-select payments/tips permissions users in this role should have, such as access cash drawer, view/edit tips, and override gratuity, and make payins/payouts.
Check Functions: select or de-select check function permissions users in this role should have, such as re-open, transfer, split checks, and edit checks from a previous trading day.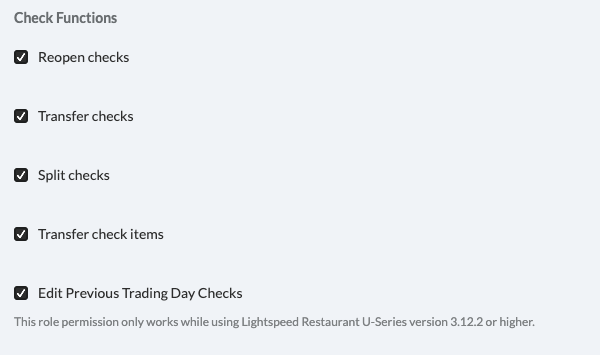 Supervisory Functions: select or de-select supervisory permissions users in this role should have, such as approve voids or comps, batch credit card payments, view and edit roles, and approve payments with alternate tender types.
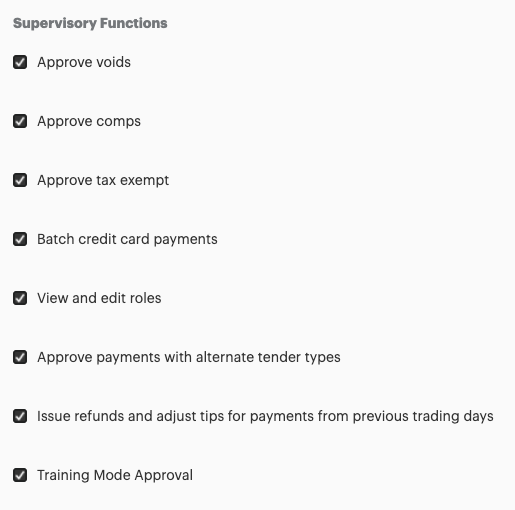
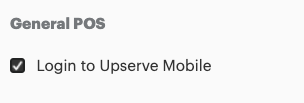
Upserve Mobile: select the 'Login to Upserve Mobile' permission to allow users in this role to log into the Upserve Mobile App.
Note: All users that will need to log in to Upserve Mobile also require an email address to be added to their user profile and create an HQ password. To learn more about HQ Access, click here
|
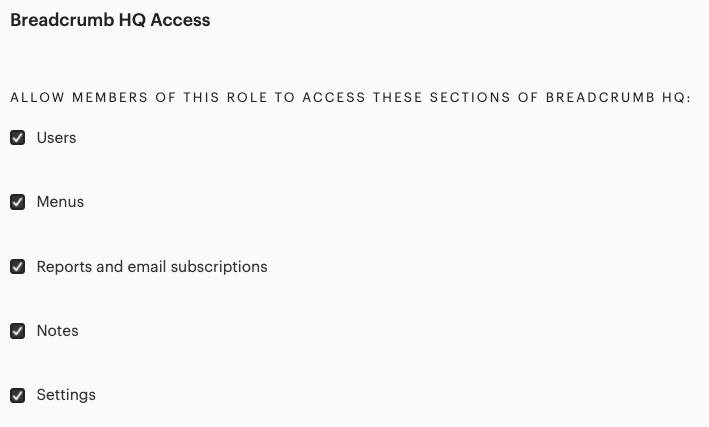
HQ Access: select what sections of HQ members of this role should have access to view and manage. HQ Access permissions are typically assigned to Admin/Manager roles.
Ex: If 'Menus' is checked, users in this role will be able to navigate to the Menus tab in HQ and view/add menu items, display groups, courses, etc.
Note: All users with HQ access permissions enabled require an email address to be added to their user profile and create an HQ password. To learn more about HQ Access, click here
|
PIN Out: enter a preferred time for when the Upserve POS returns to the pin in screen after inactivity on the POS. The default is 60 seconds of inactivity until the PIN screen appears.
- When ready, click SAVE to save the Role

Now you are ready to add Users and assign them Upserve POS roles. To learn how to add new Users, click here. 
