Items are menu and merchandise selections. Items require a number of selections and settings in order to add them to the Upserve by Lightspeed POS. Use this article to learn how to create and edit items. When you finish creating/editing menu items, remember to always click SAVE.
Use these quick links to jump to different sections:
Create an Item
Add an Item Name, Price & Category
Assign an Item to a Display Group
Assign Taxes to an Item
Add an Item Description, Sort Code & Identifier
Assign a Course
Override Price
Item Level Printing & Suppress from the Customer Receipt
Status & Stock Levels
Assign Modifier Groups & Sides
Create an Item
- Log into HQ
- Click on Menus > Item
- Click Create Item
| Note: In order to edit Menus, you must have access to HQ and your user profile must be assigned to a point of sale role that has HQ Access > Menus enabled. To learn more about Users and Roles, see Creating Users & Roles in New Upserve HQ. |

Add an Item Name, Price & Category
After you select Create Item, you will need to begin configuring your item settings.
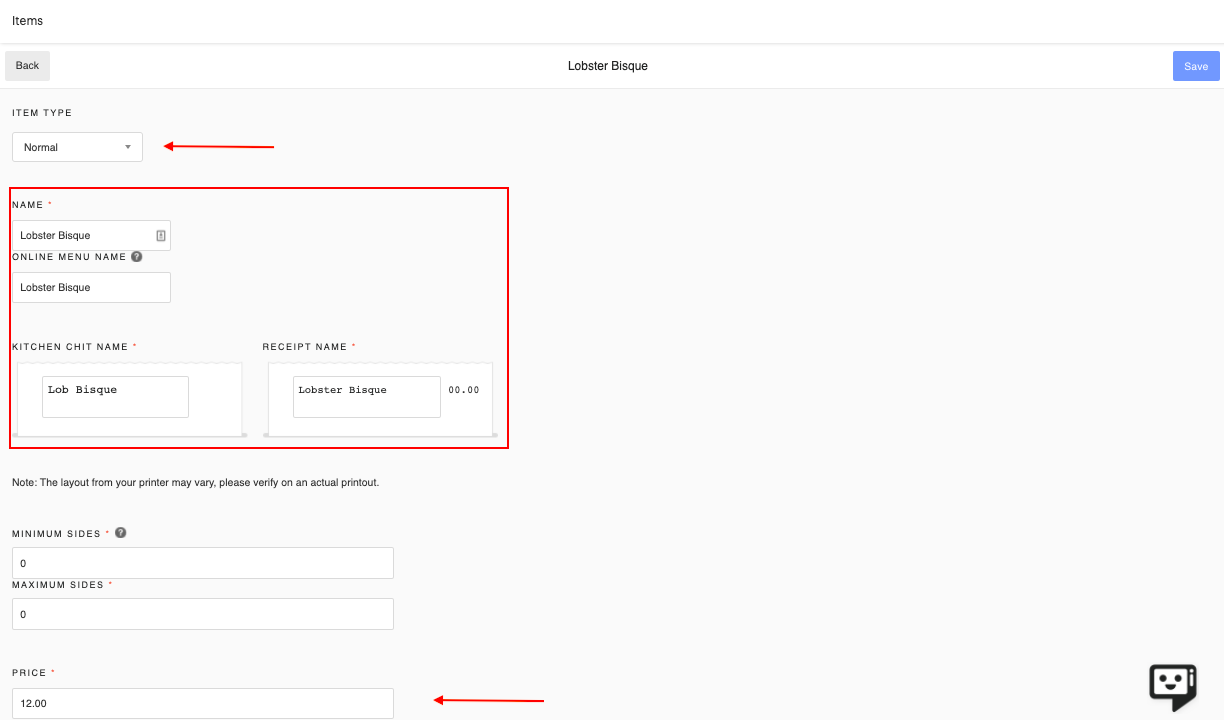
Item Type
Revenue items, such as food and beverages, should be set to Normal Item Type. To learn how to create Non-Revenue Items, such as Deposits and Gift Cards, see Receipts and Non-Revenue Item Reporting.
Item Name
When you begin typing the Name of your menu item, it will auto-fill the Name, Kitchen Chit Name, and Receipt Name boxes. You can click into each text box to edit how your wish the item name to appear.
|
Name
|
Item name that appears in the Upserve by Lightspeed POS
|
|
Online Menu Name
|
Item name that appears on your Online Ordering Menu webpage
|
|
Kitchen Chit Name
|
Item name that prints to the kitchen/bar chit
|
|
Receipt Name
|
Item name that prints on the guest receipt
|
Tip: You can abbreviate the Chit Name, so items print on one line and are quick/easy for prep staff to read.
Minimum & Maximum Sides
If you want to assign sides to your item, you can designate the minimum and maximum required side selections. You can assign sides to your item at the bottom of the item page. See Assign Modifiers & Sides.
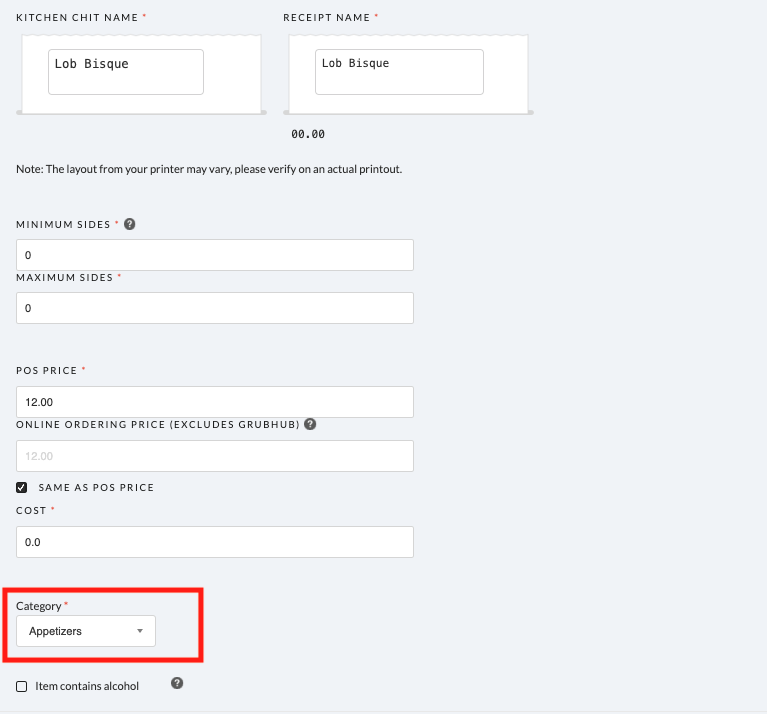
Price
All items require a price in order to be saved to the Upserve by Lightspeed POS. If an item does not have a price, you can enter 0.00 into the price field. You can also set up an item to allow for a price override. See Override Price, Item Level Printing & Stock Levels.
Online Ordering Price
If you wish to have an item be a different price on Online Ordering than it is on the Point Of Sale, you can enter the price in the Online Ordering Price field. This price will reflect on Lightspeed U-Series Online Ordering as well as BiteKiosk, Zuppler, and Chowly. Grubhub does not support this feature, and will list the amount in the Price field above.
Cost
If you want to note the prep cost of your items, you can enter a value into the cost field. If you would like to track food cost, we recommend using Upserve Inventory to track food cost, order ingredients and manage suppliers.
Category
Categories are the groupings of items for printer routing and reporting. The item will print to the default category printer (unless a printer group is assigned at the item level). The item sales will contribute to the category sales in HQ Reports. To learn more about categories, see Create & Manage Categories.
Item Contains Alcohol
This check box is relevant only if you want to list Alcoholic items on your Grubhub menu. By default, Grubhub will not list items containing Alcohol on your menu. Your restaurant must complete Grubhub compliance, otherwise the alcohol items will be automatically hidden from the menu. The restaurant should work with their Grubhub Account Advisor/Enterprise Partner Manager to set up a Stripe account and get their liquor license on file. Checking this on the item level will tag the item for Grubhub to ensure you're within compliance before listing it on the menu. This checkbox currently serves no other purpose, and can be ignored if you are not using Grubhub.
Assign an Item to a Display Group
Display Groups are the tabs that appear along the side of the Upserve by Lightspeed POS menu display. You can assign an item to one or more display groups. If an active item is not added to a display group, it will still be searchable in the menu search bar. To learn how to create display groups, see Create and Apply Display Groups.
To assign a display group(s) to an item, follow these steps:
- Click Add to Display Group
- Click on the display group(s) you wish to add the item to until is says Yes in the Added column
- Click Done
| Note: If you refresh or leave the item page before saving your item, your added display groups will disappear. Make sure to check that display groups are added and your item is saved before navigating away from the item page. |

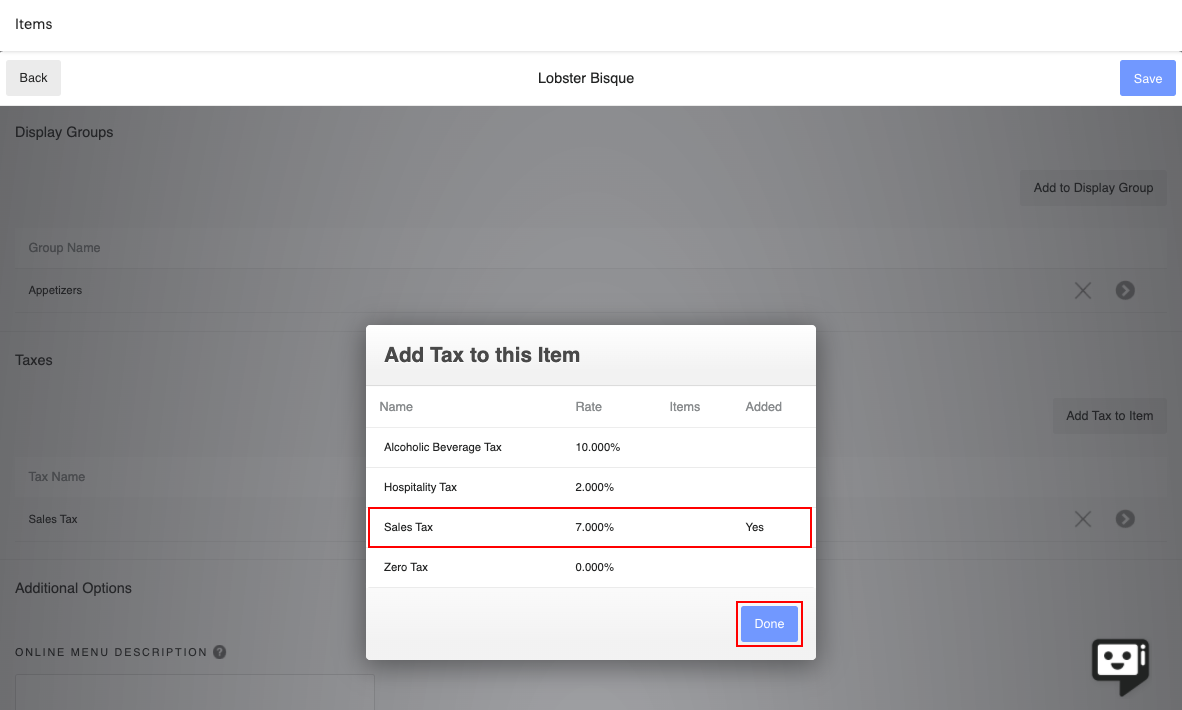
Assign Taxes to an Item
In order for the Upserve by Lightspeed POS to correctly calculate taxes for your menu items, you will need to assign taxes to each of your revenue items. The Upserve by Lightspeed POS allows you to assign one or multiple tax rates. If you need to set up your tax rates, see Sales Tax Overview.
To assign a tax rate(s), follow these steps:
- Click Add Tax to Item
- Click on the tax rate(s) you wish to add the item to until it says Yes in the Added column
- Click Done
| Note: Upserve customers are responsible to setting up and applying tax rates to items. If you are unsure what tax rates to set up and apply, consult a tax expert and get the help you need before selling items. |
Add an Item Description, Identifier & Sort Code
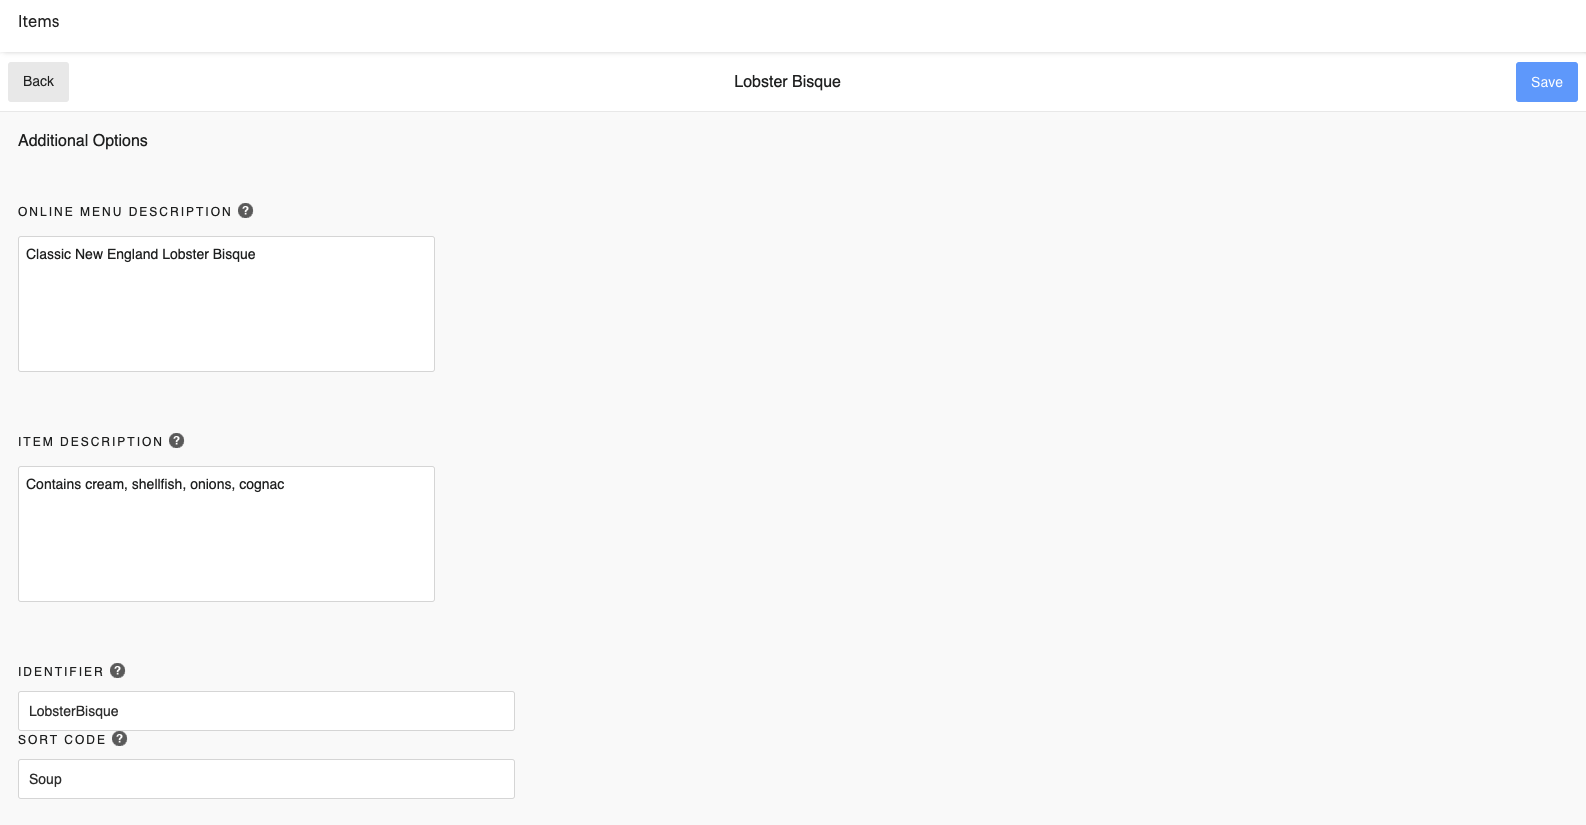
Online Menu Description
You online ordering menu page will display an item description if you enter any text in this field. To learn more about Upserve Online Ordering, see Upserve Online Ordering Overview.
Item Description
On the Upserve by Lightspeed POS, after you add an item to a check, you can click on the item to edit the item. On the Edit Item screen, Item Description will appear. Item descriptions can be used to add cocktail recipes, list recipe allergens, a description of how servers should explain a dish to a guest, etc.
Identifier
Identifier codes are sometimes required for menu integrations. If you use Upserve Inventory, you can also use this field to enter menu item codes for inventory. An identifier code can be a series of numbers/letters or the name of the item. To learn more about inventory item codes, see How to Create Menu Items/Recipes in Upserve Inventory.
Sort Code
Sort codes help staff search for items quickly in the HQ item list and in the Upserve by Lightspeed POS menu search bar. For example, when searching on the Upserve by Lightspeed POS menu search bar, "Lobster Bisque" will appear in a search for "Soup" based on the Sort Code setting pictured below.
Assign a Course
Courses are how items are ordered on checks to instruct the kitchen how to pace a meal. Items require a course assignment and the course you select will determine where the item appears on the check and kitchen chit. To learn how to create courses, see Create & Manage Courses.
Override Price
Items can be set up to allow for a price override. This can be used for Market Price menu items, gift cards, or any item that requires different prices to be applied. To turn on Price Override for an item, check the "Allow price override" check box and save.
Item Level Printing & Suppress from the Customer Receipt
Item Level Printing
In the printer group section, an item by default will print to the category printer group (See: Create & Manage Categories). If an item needs to print to a different printer group than the category, you can click on the dropdown menu under Printer Group and select a printer group for the item.
| Example: The "Cheese Plate" item is assigned to the "Dessert" category for reporting purposes. The "Dessert" category prints to the "Pastry" printer group. The "Cheese Plate" needs to print to the "Cold Station" printer group. The "Cheese Plate" is assigned to the "Cold Station" printer group at the item level. |
Suppress from customer receiptIf you have an item on your menu that
should not print on a customer receipt, check the "Suppress from customer receipt" checkbox, set the item price to $0.00, and save. This setting can only be applied to items with a $0.00 price.
| Example: A restaurant may offer a free "Bread Basket" item to guests at the beginning of their meal. The server can add "Bread Basket" to the guest's check and tap "Send" when they are ready for the item to be prepared and served to the guest. Since this is a free item that each guest receives, the restaurant may not want this item to print on each guest receipt. The restaurant can turn on the "Suppress from customer receipt" setting for the "Bread Basket" item, so that it only prints on chits and not on receipts. |

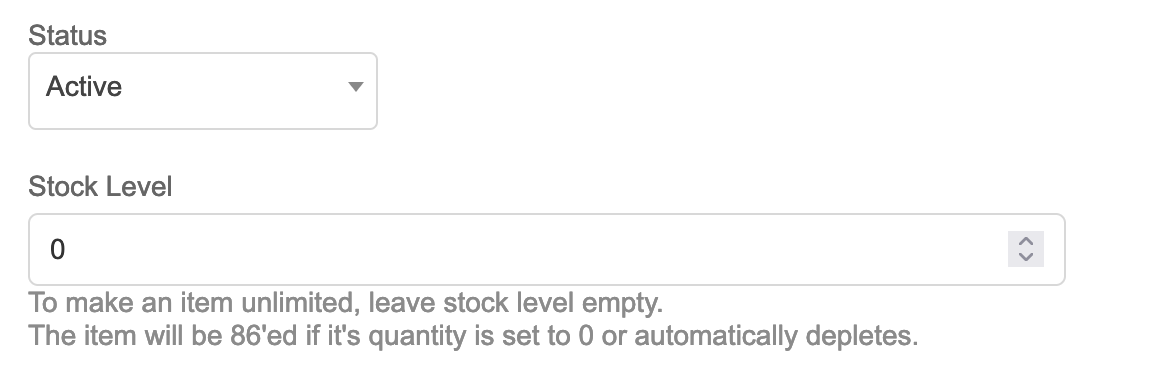
Status & Stock Levels
Status
New items are automatically listed as Active in the Upserve by Lightspeed POS. To remove a item from the Upserve by Lightspeed POS, follow these steps:
- Log into HQ
- Click on Menus > Items
- Click on the Item you wish to archive
- Scroll down to Status
- Click on the Active status and select Archived
- Click Save
Stock Levels
Upserve by Lightspeed POS allows you to set item counts for items that have a stock level. When an item has a count, each time that item is ordered the stock level will be depleted by one. The item will be automatically 86'd when the last one is ordered. If you want to set a count, enter a value for Stock Level. To learn more, see Set an Item Count & Manage Stock Levels
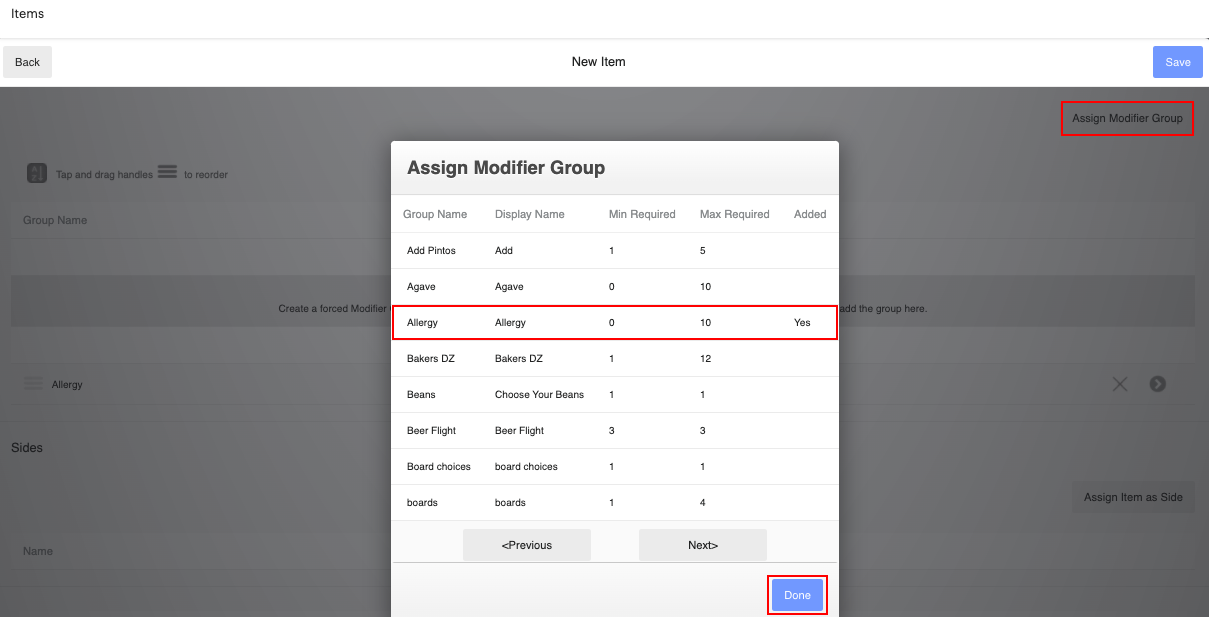
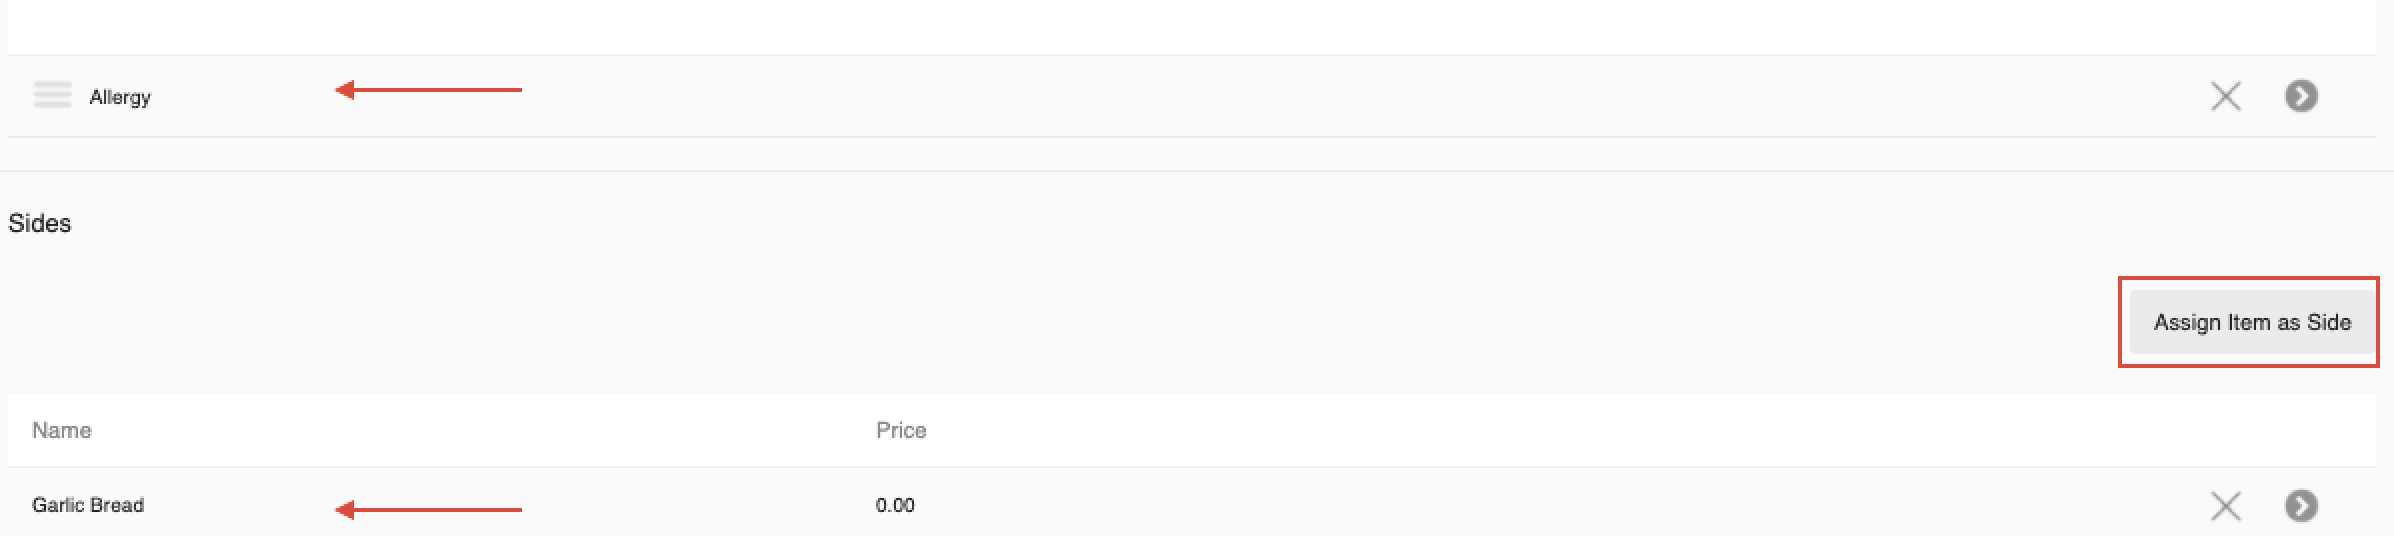
Assign Modifiers Groups & Sides
Modifier Groups
Modifiers identify specific adjustments to an item, such as the temperature of a steak, a gluten allergy, or a burger topping. Modifiers are assigned to Modifier Groups. To use item modifiers, you need to assign a modifier group(s) to the item. To learn more about creating modifiers and how modifiers appear in the Upserve by Lightspeed POS, see Adding Modifiers to an Item.
To assign a modifier group(s), follow these steps:
- Click Assign Modifier Group
- Click on the modifier group(s) you wish to add the item to until it says Yes in the Added column
- Click Done
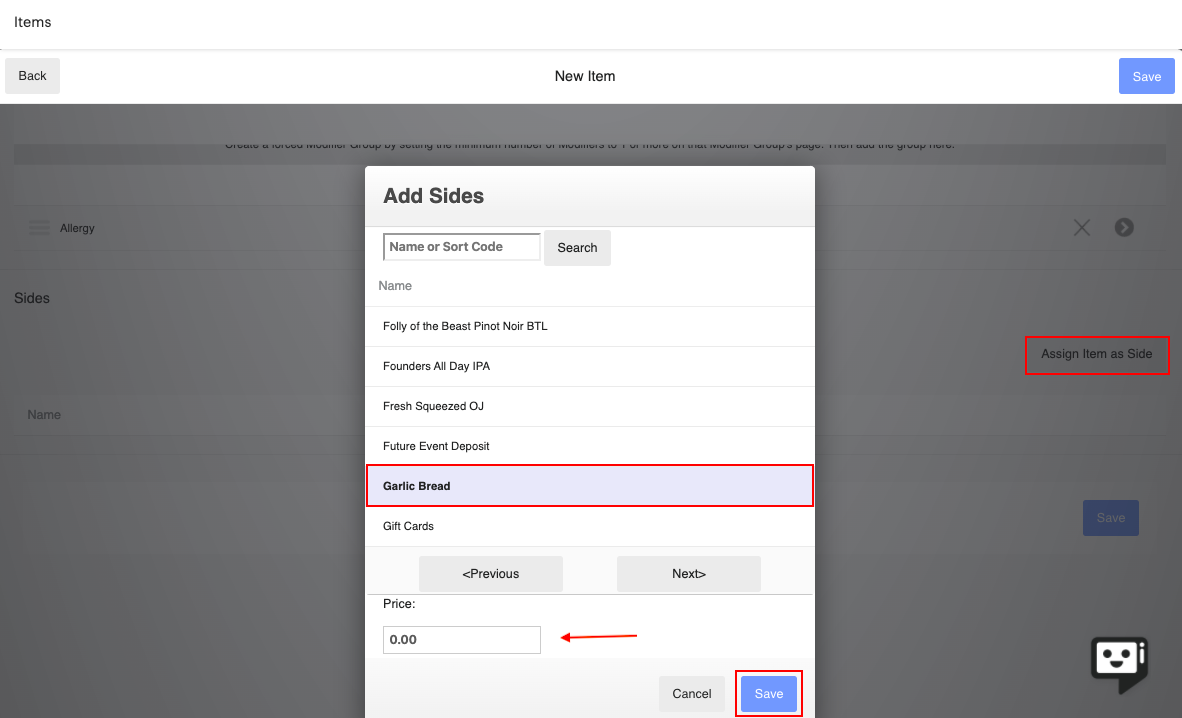
Sides
Sides allow you to select active menu items and apply them as side dish to an item. When you assign sides, you are selecting items from your item list. You can set sides to be $0.00 or apply a price that is added to the item price.
| Example: You have a French Fries item on you menu, so guests can purchase a plate of fries. You can assign French Fries as a free side to the Burger item on your menu. |
To assign a side(s), follow these steps:
- Click Assign Item as Side
- Click on the side item you wish to add the item to until it is highlighted
- Edit the price (optional)
- Click Save
| Note: When you finish creating/editing menu items, remember to always click SAVE. |

